Hello my First App!
Welcome in DRAW
Okay enough talking, what about we get our hands into DRAW and create our first application? 🔧
If you followed the previous chapter, you should already have DRAW opened in a tab. If not, I invite you to check it again.
Let's do a quick overview of the interface, here is what you should approximatively see:

In order we have:
- This is the editor area, there are many different editors depending on what we are working on. Right now we are in the Repositoy Editor. This editor allows us to explore, create and organize Projects.
- This is the breadcrumb area, it shows us where we current are. For me I am in Demo which itself is in Home, for you it's probably only Home, I will tell you how to change that in a moment 😉
- This is the menu area, the Help button gives you some useful links. And if you click on the Profile icon right next to the Help button, you can see various information: the current version, some advanced options, your logged user email, and the logout button.
- This is the Marketplace, it's from this place that we will create everything. It is with the editor area the two most important parts of DRAW, where we will do most of our work. The content of the Marketplace actually depends on the current editor we are in.
- This is the Learn the Basics area, you can find tips and tricks about the current editor, and how to get started in it. It's always a good idea to have a look at it, and you can collapse it when not using it (click on the 🔽 icon).
All of this may already feel a bit overwhelming for some of you. Indeed there are a lot of new stuffs and names to remember! And it is perfectly normal, you are learning a brand new world after all. But no worry, you don't need to remember all this directly, it will come intuitively with practice I can guarantee you that. I will also repeat the important thing when we get to it 😉
Hello World!
In the world of developement there is a tradition of making an application that shows: Hello World!
It's always quite simple and a great first exercise, it also serves as a check if everything is working. So about we do it with Olympe? 😃
Here is an example of a Hello World! app done with Olympe, and we will do our own!
First thing first, I told you in the previous section that my Repository Editor is empty and yours is probably not. You have some tiles in it by default and that's normal. For now you don't need to worry about it but later, when you have a greater understanding of Olympe, you will be able to explore it at will.
Now how about you get an empty repository like me? Pretty simple you will see. Put your mouse on the tile Folder in the Marketplace (on the right), click on it and drag the tile on the Repository Editor, then release the mouse. You will see a New Folder appear, and now you have a chance to give it a name (choose any name, but if you have no idea you can call it First Steps with Olympe).
I will show you all that in this gif:

Note that the gif also shows you how to rename the folder from two places. Now double-click on the fresh new folder and we are ready to continue!
Folders allow us to organize our projects in any way that suit us. Exactly like folders on your computer to organize your files.
We are now in our new folder. I got a question for you, how would you create a Project now? Go ahead and try!
Did you find it? The process is exactly the same as for the folder we created just before, the only difference is to drag-n-drop the Project tile instead. Let's call this project Hello World! and double-click on it to enter. If you gave another name that's fine, but if you want to rename it I let you check the previous gif again 😉
The Project Editor
Now let's have a look at the project interior (I collapsed the Learn the Basics for more clarity):

- This is the Project Editor... actually that's not true. We are in the Folder Tab which itself is in the Project Editor. Oh no, now we're have tabs too?! That may sound complicated, but I promise you it's not. I want to be precise with my description but it's not that important, to be honest the Folder Tab is the main part of the Project Editor, it's here that most work will start from. So as a shortcut we can somehow call it the Project Editor 😉 Maybe it will be clearer after reading the 4. point.
- This is the Marketplace, same as in the Repository Editor. However its content is not the same, we have quite a few more options here. This is a good way to tell that we changed from one editor to another, indeed the content of the Marketplace depends directly on the editor we are in (or on the tab).
- The breadcrumb again, this one is always present anywhere you currently are. Yours should be the same as mine (without the Demo). Try clicking on a name in it, it will bring you back up to that part directly. It's very useful to navigate in DRAW and you will use it quite often.
- Now this is the real Project Editor, this editor is actually composed of multiple tabs, and right now we are in the Folder Tab. You can switch between them here, we won't need the others for the moment, we will see them later on.
- When you are in a Project, you have the ability to do a global search here. We will also see how it works and how to how it in future chapters.
You may have a question at this point: But what is a Project exactly?
Good question, let's put it this way:
A project is like a container where you put all the things needed to achieve the said project. Like a dinner table at a restaurant, where the waiter will put all the dishes and stuffs that you need to eat it, but the project also contains the kitchen with all the pots, pans and ingredients that lead to a great eating experience. In our case a project will contain all the data, visuals and logic for our applications, and much more in some cases.
It's basically the workbench to all the work we will do with Olympe, and it can contain a lot of different stuffs depending on the purpose of the project itself. As you can see it is quite vague, but that's because a project can be a lot of things.
For the moment our project will be quite simple, and its purpose is to show Hello World! in an application. So let's continue and see how we can do that.
Your first ever Application with DRAW
For this section I will ask you to just do as I say, I won't explain much because we will see all that in the coming chapters 😉 Each steps are shown in the gifs to help you out.
1. First we need an UI App
- In the Marketplace: find the UI App (by scrolling or you can typ in the search bar)
- Drag-n-drop it in the project and name it Hello World!
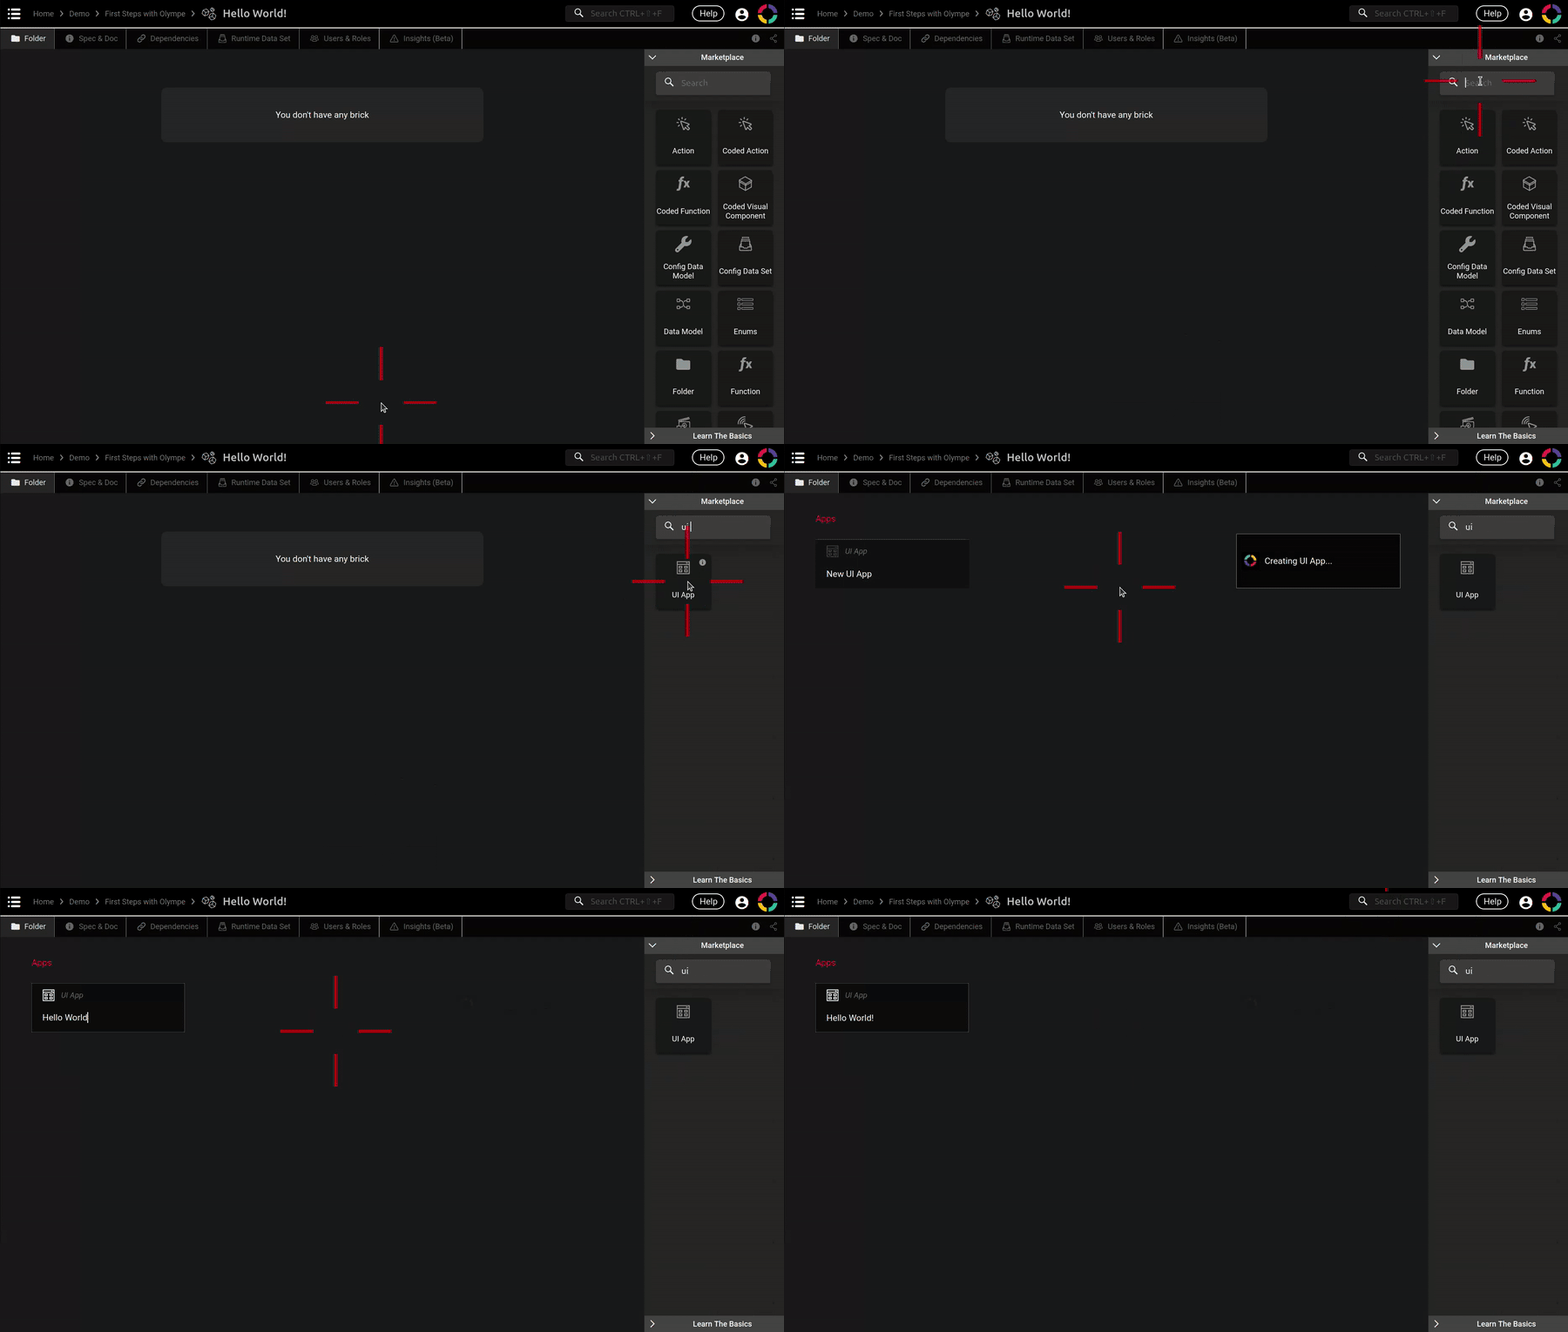
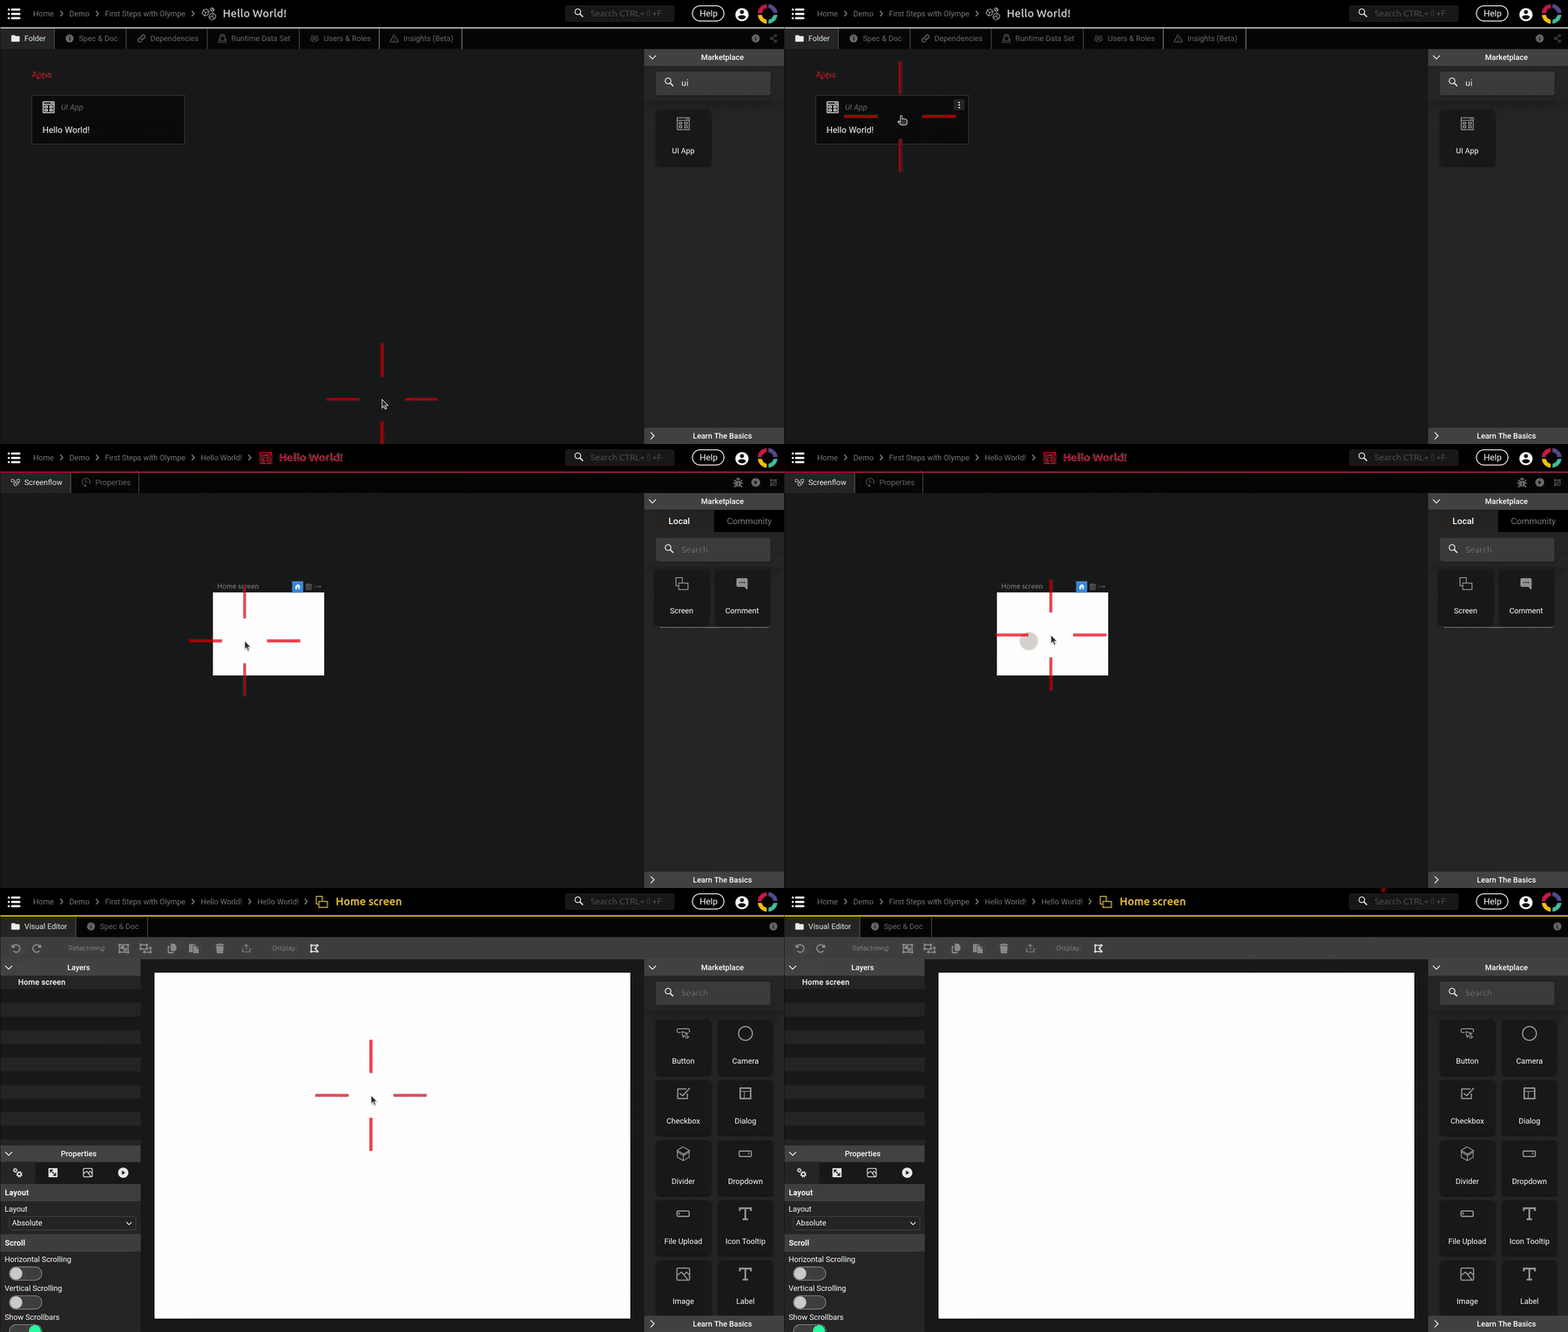
2. Then we need to enter the UI App
- Double-click on the UI App, it will open the Screenflow Editor
- Double-click on the Home screen, the single white rectangle in the middle
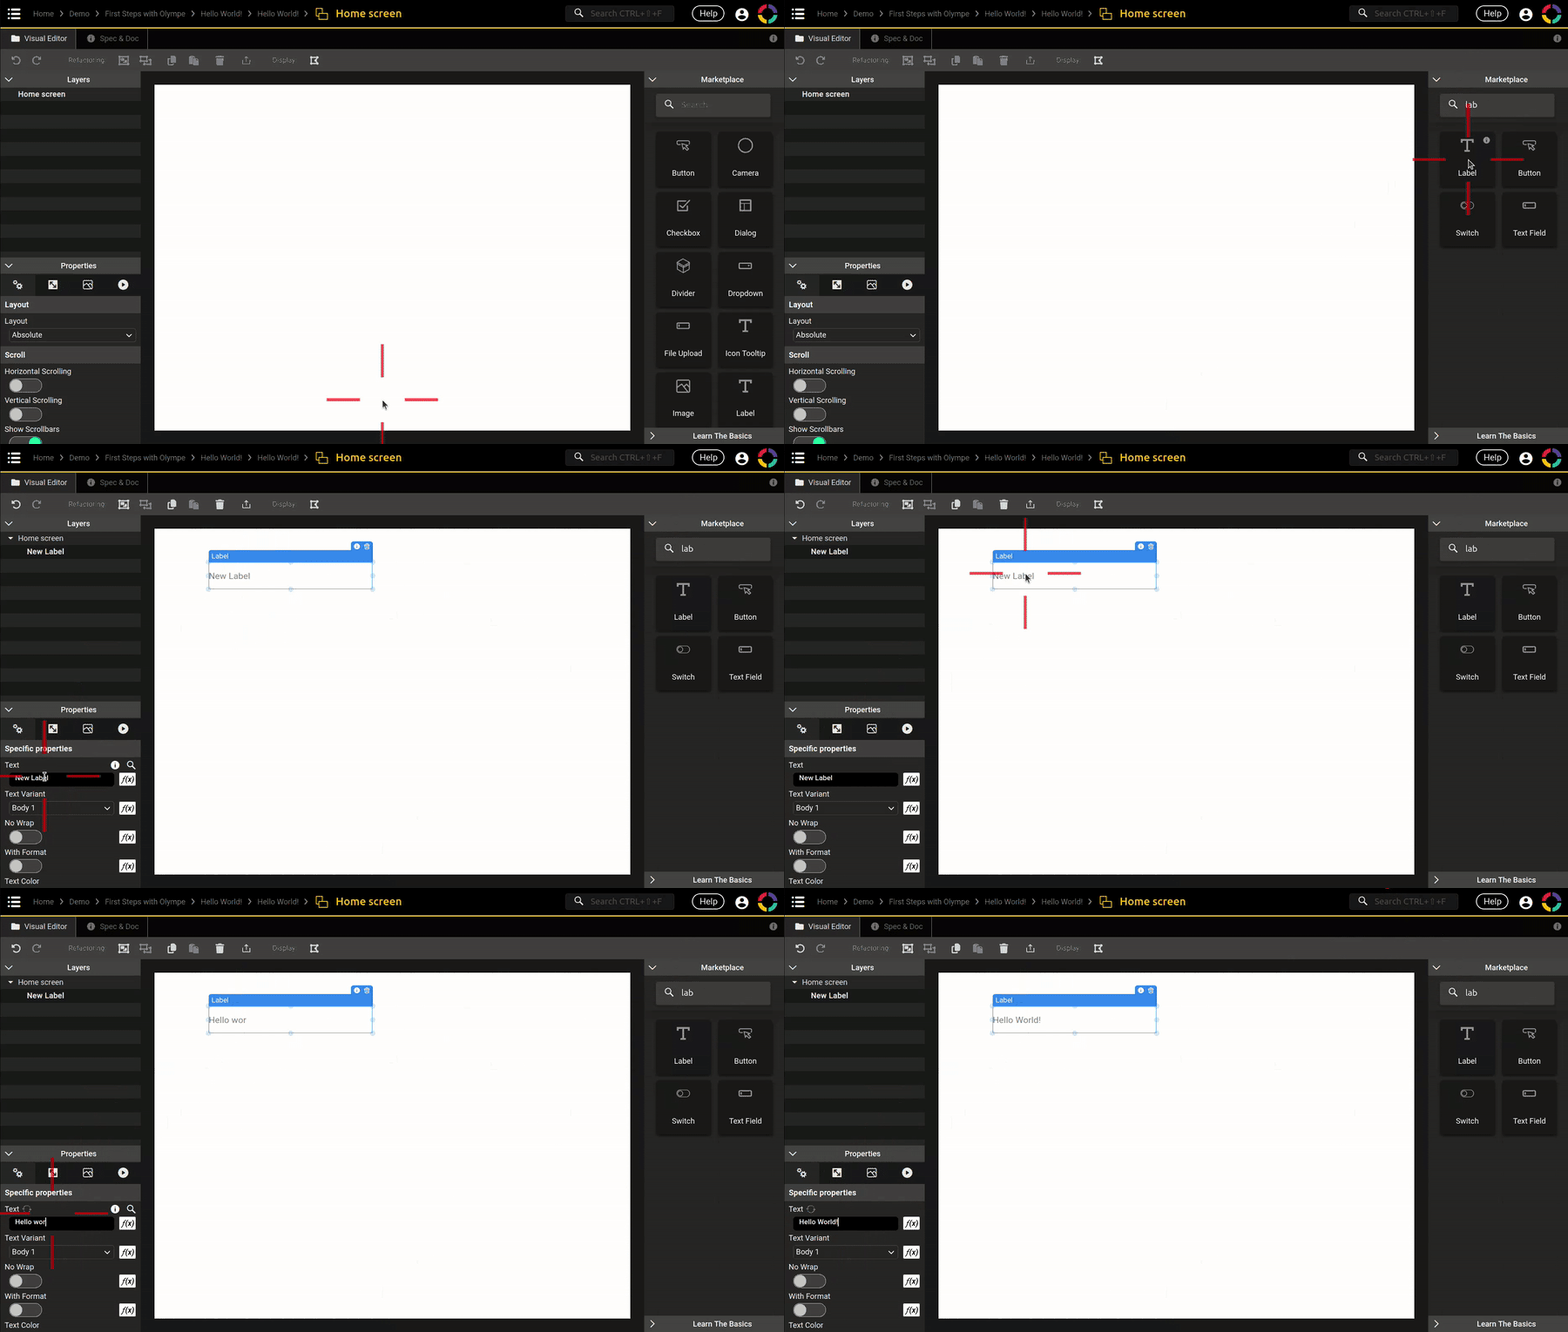
3. Now we need a Label
- We are now in the Visual Editor, it looks a bit different but we will see that later
- In the Marketplace: find the Label and drag-n-drop it on the white area in the center
- In the bottom left area, under Properties, find the Text property
- Make sure the label is selected by clicking on it
- Replace the New Label text with Hello World!
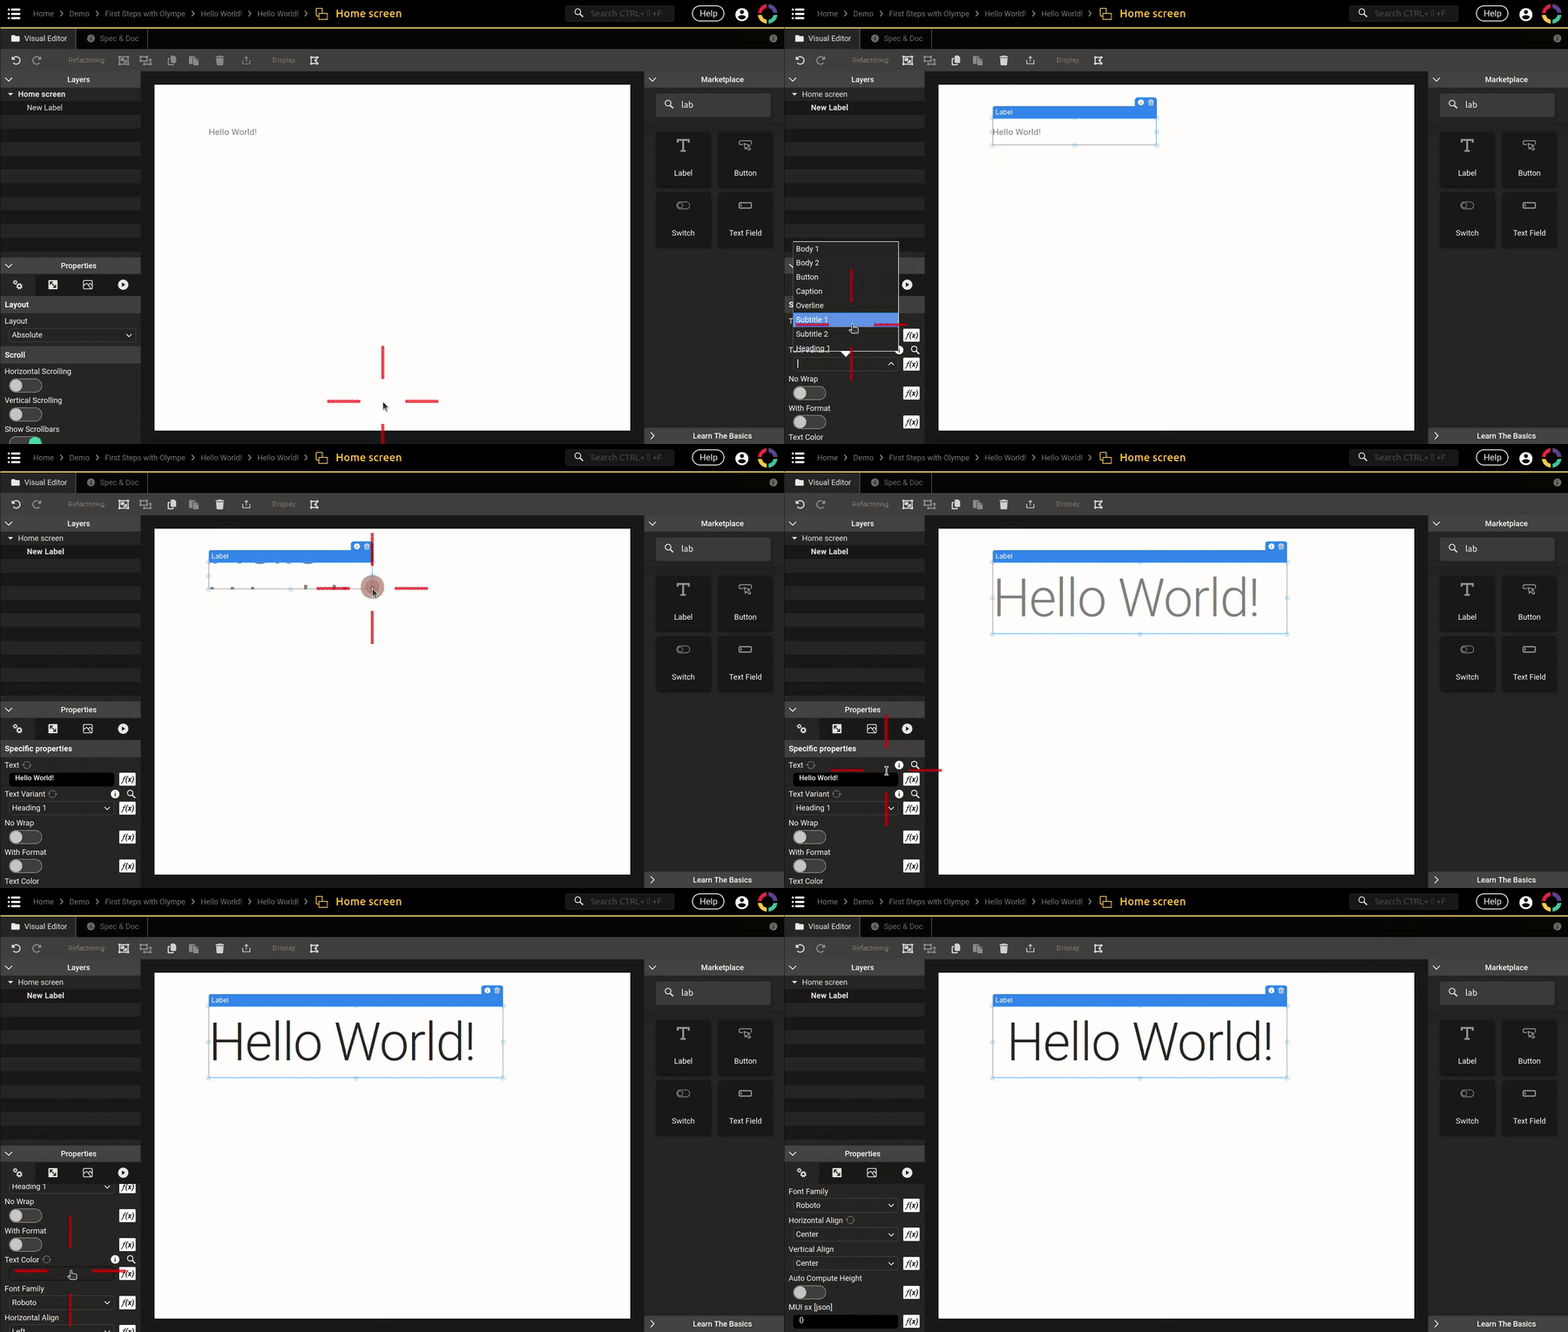
4. Then we can customize it
- Make sure the label is selected by clicking on it
- Change the Text Variant to Heading 1
- Resize the label as shown in the gif below, you want the text to appear completely
- Change the Text Color to any color that you like
- Change the Horizontal Align to Center
5. To finish up we can center it
- Make sure the label is selected by clicking on it
- In the Properties, click on the 2nd tab
- For X, select the Center option in the dropdown list
- For Y, select the Middle option in the dropdown list
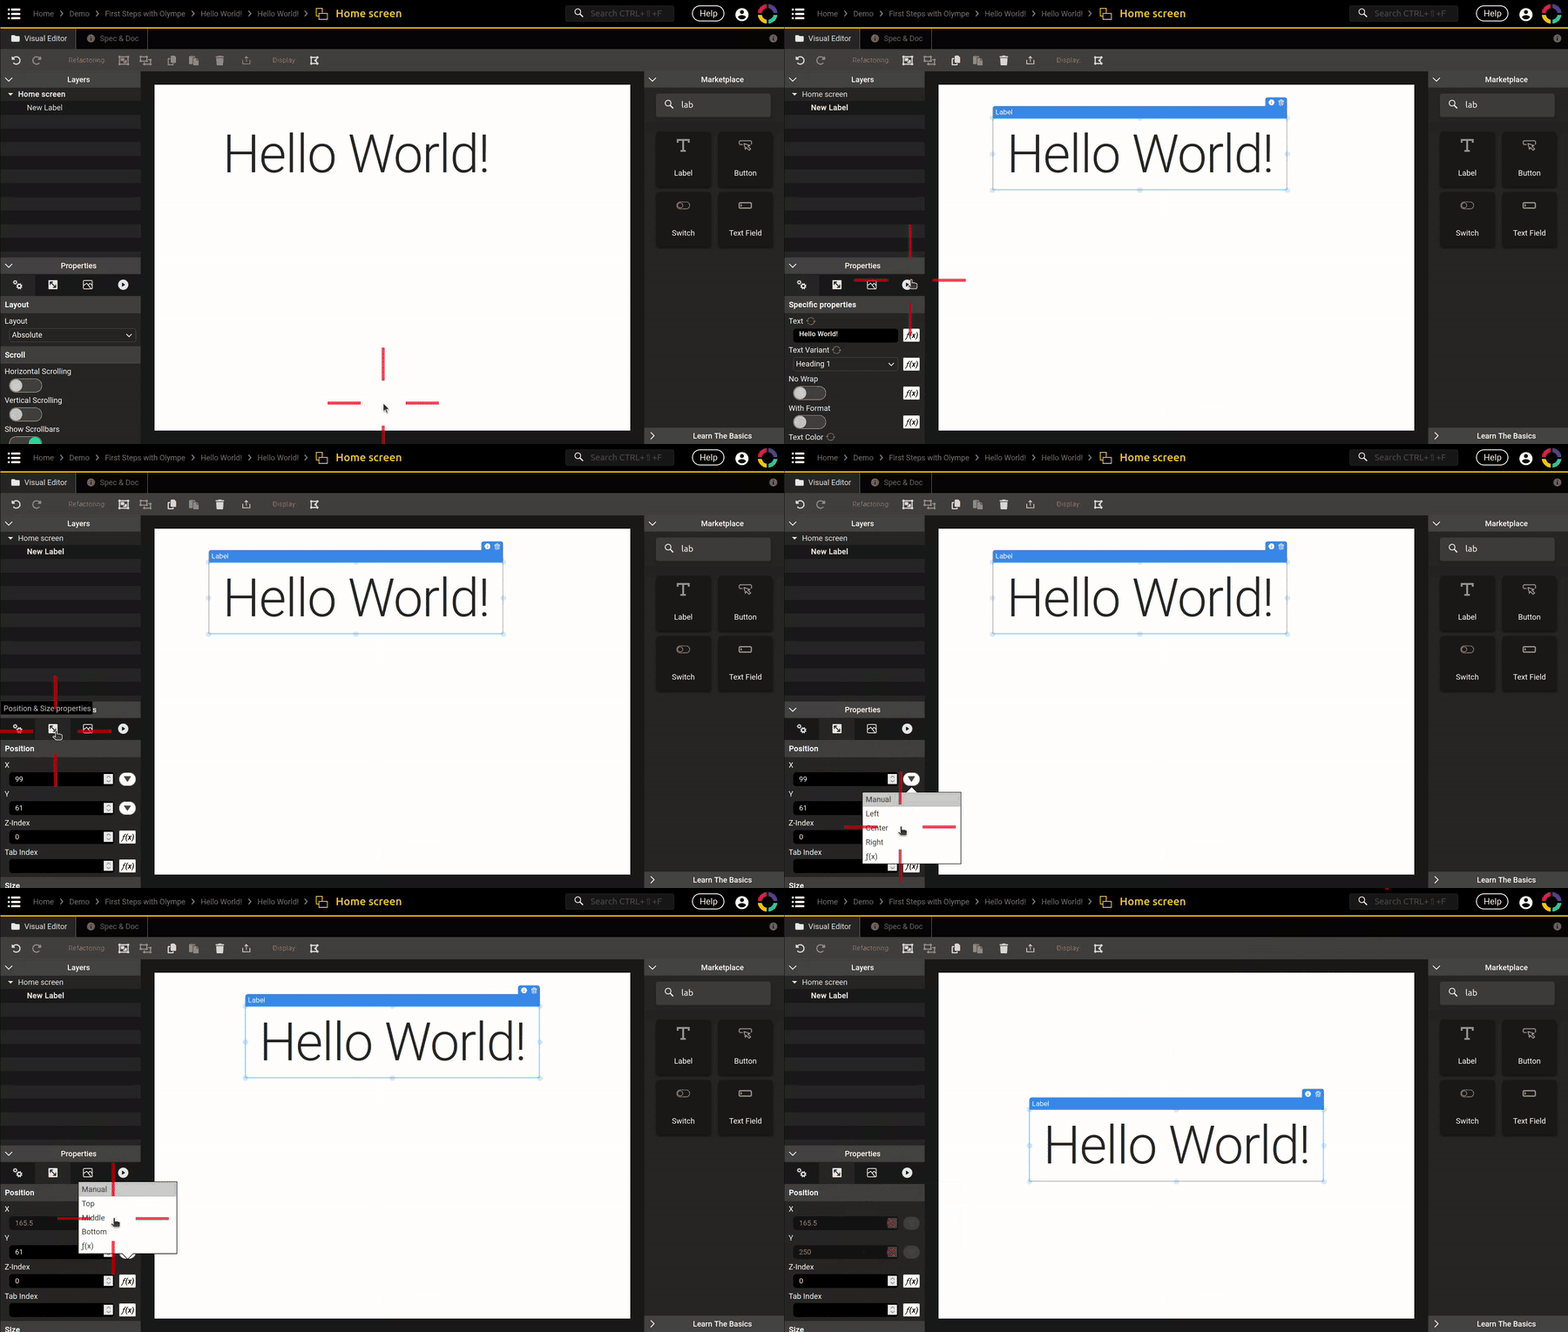
That's it! Everything is in place, we did quite a bit more than the simplest Hello World! version actually 😉
Congrats! You just created your first ever application with Olympe 🎉
Now let's see how to run and test it!
How to run an App?
At this point what is left to do is to test our application.
How to do that? By running it, which means opening it in a new tab in our browser.
We can do that from two places (there is no difference between them), I let you check out the gif:
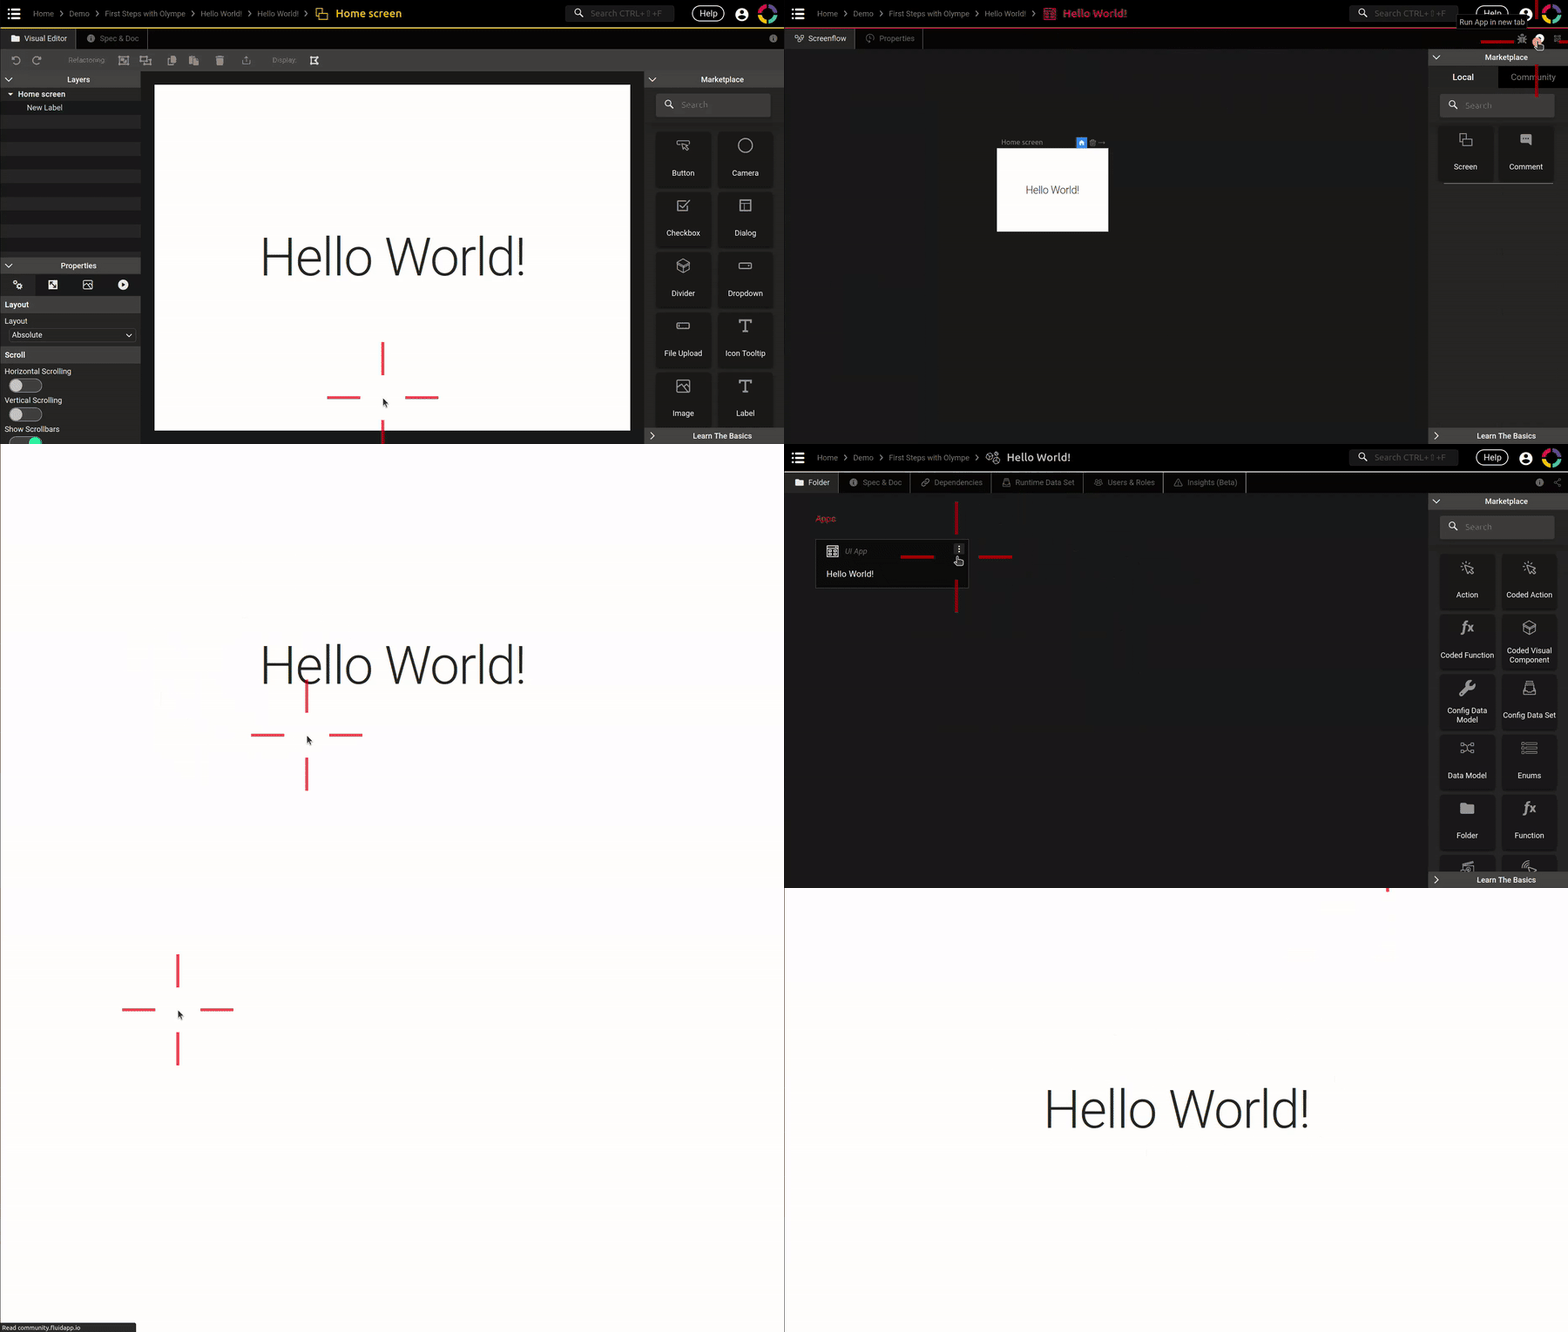
Pretty cool isn't it 💪
In the next chapters we will explore all that and much more!
How to test on a mobile phone?
DRAW also offers a shortcut for testing the application on your mobile phone.
It shows a QRCode and all you have to do is scanning it:

The Heading 1 we used for the Text Variant may be too large for some phone screen.
If that's the case you can try changing it to Heading 2, we will see how to handle those kind of cases later on.