Workflows
A workflow defines sequences of states in which the instances of a Data Type go through.
More generally it's the sequence of steps involved in moving from the beginning to the end of a working process.
Synonyms of state could be: step, phase, activity, etc.
(depending of your business logic)
Features and constraints
Workflows at Olympe support a number of features and impose some constraints on them for better design.
- On Workflows:
- Always have an Initial State
- Are associated to one
Data Type - Historize all transitions and initializations
- On States:
- Have a unique name for each State
- Are not limited in number
- On Transitions:
- Have a unique name for each Transition leaving a given State.
A State can transition to multiple States, in which case, each Transition must have a unique name.
- Must be unique between a pair of origin/destination States
- Can have the same State as the origin and destination
- Can have an optional Process function called when the Transition is triggered
- Have a unique name for each Transition leaving a given State.
- On object states (history):
- Contain the name of the Workflow, of the State and of the assignee (
User) - Contain the date and time of the transition/initialization
- Optionally contain the serialized object's properties as a JSON string
- Contain the name of the Workflow, of the State and of the assignee (
Workflow examples
Let's take a look at some examples.
To-do list task
A very simple example to start with: the workflow of a task in a To-do list.
The task starts in the To Do state, then moves to Doing and then to Done when finished.

Fishing license validation
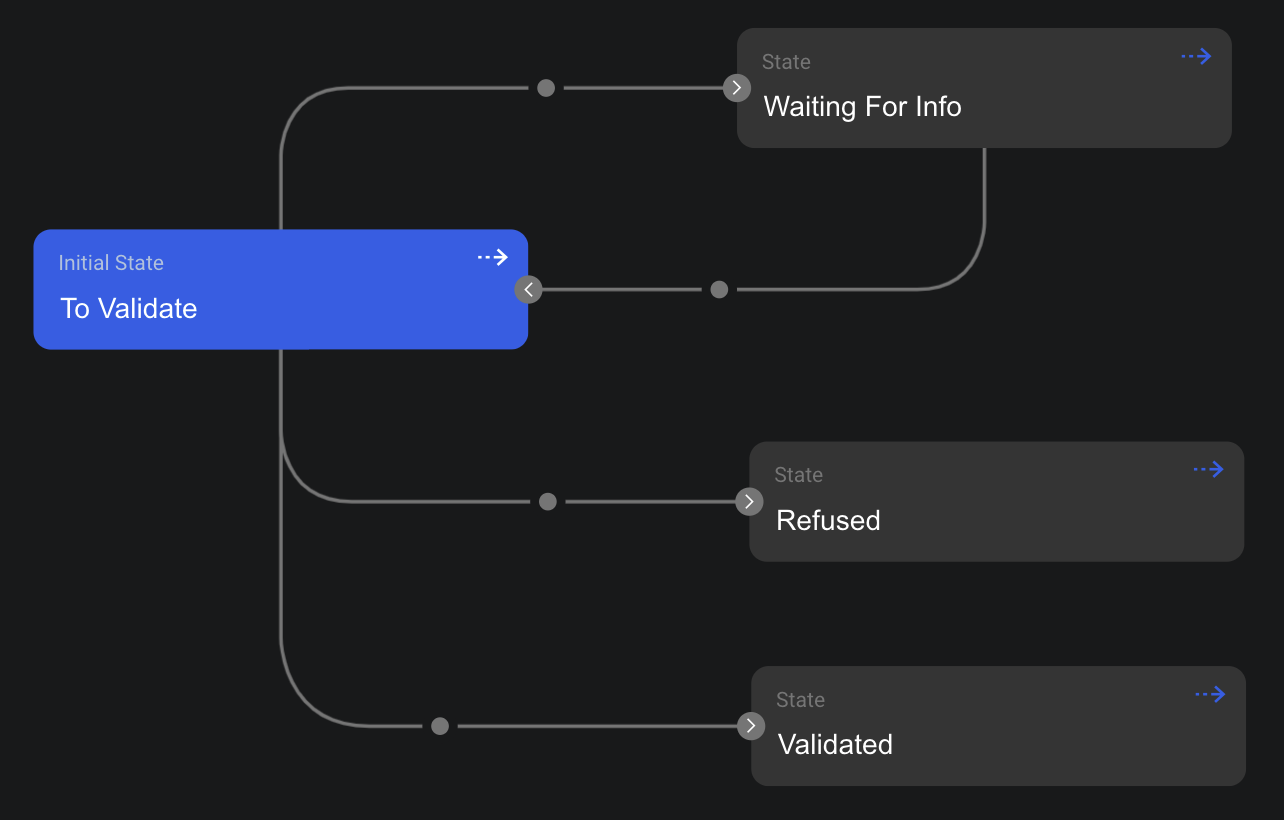
A bit more complex one: a fishing license application to request and accept/refuse fishing licenses.
The license starts in the To Validate state, then it can go to the Validated or the Refused states.
If some information is missing, the license can go back and forth to the Waiting For Info state.
Online shopping cart
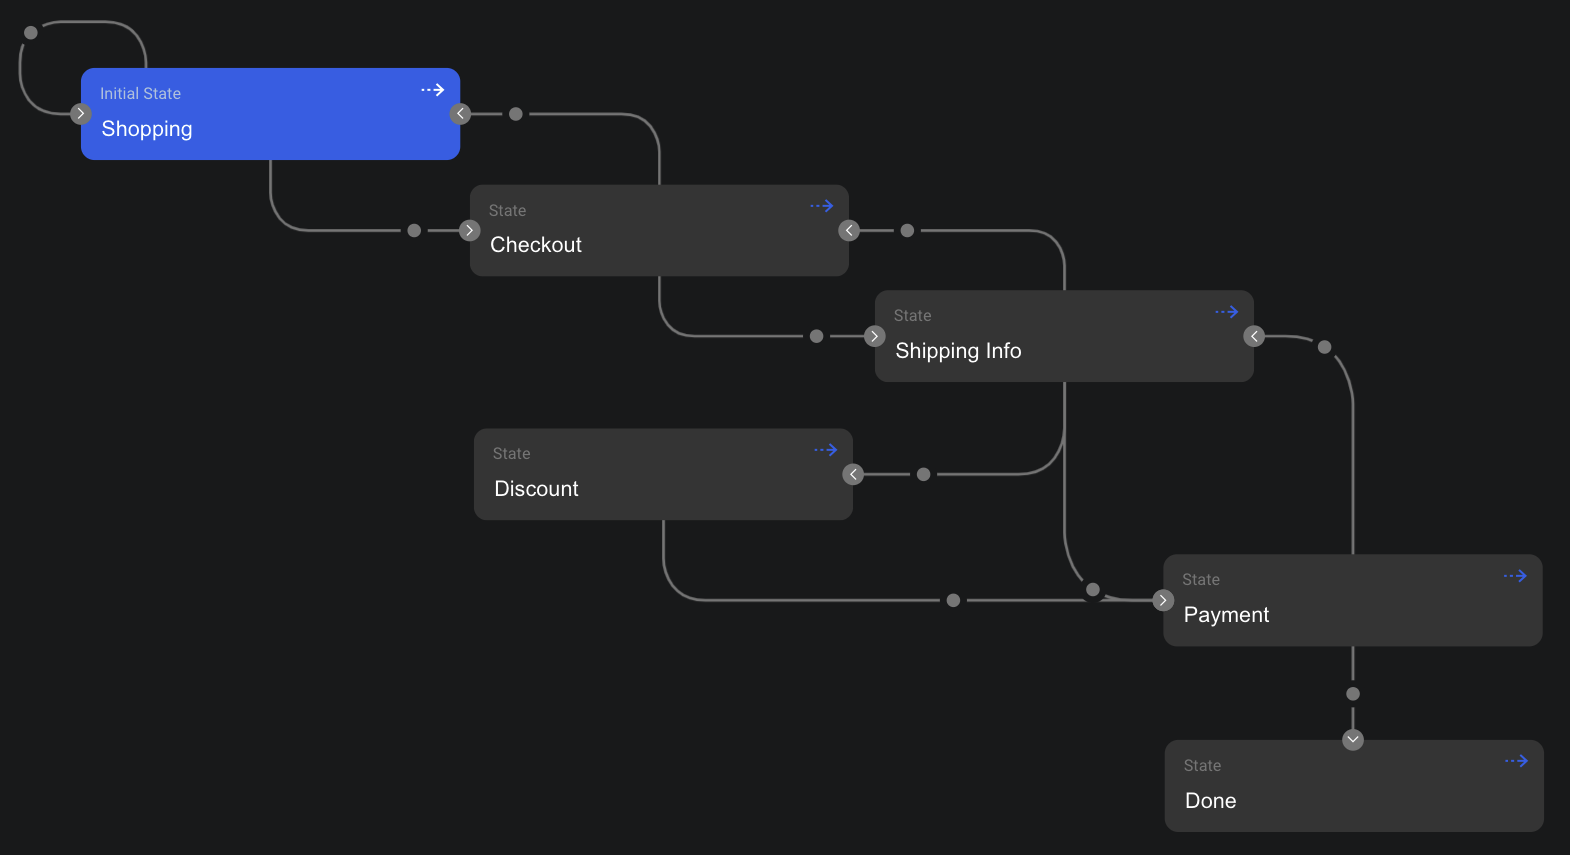
Here we have the steps for an online shopping cart.
The cart can go back and forth until the Payment is Done.
Note also the self transition of the state Shopping, that we can use when adding or removing items to/from the cart.
Note also the optional Discount step used if the user has a voucher for example.
Game server room state
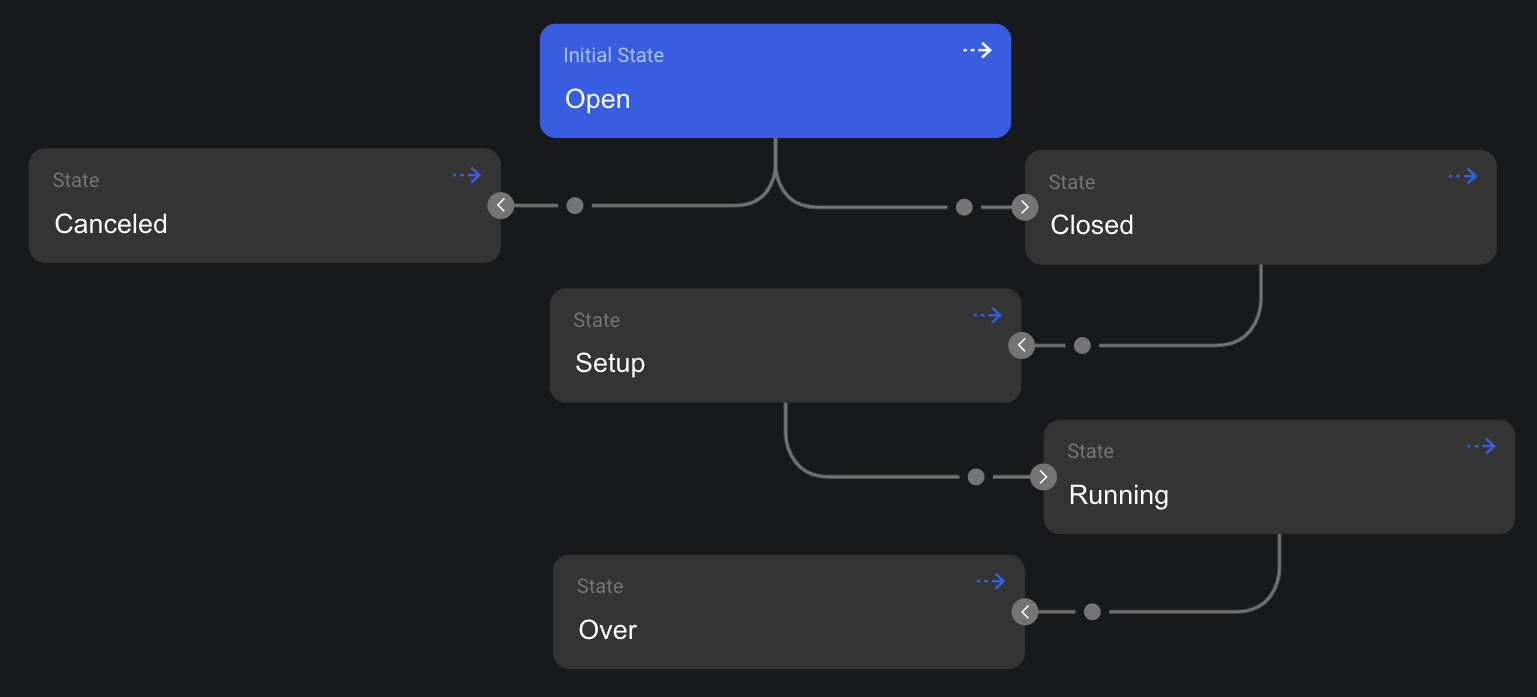
One last example from a project done sometime ago. It was about an online game in which players could create rooms, wait for players to join and then start the game.
The started room (in the Closed phase) was then processed by the game server to handle all game logic. The players also always knew in which phase the server room was (Setup, Running, etc).
Create a Workflow
Create one by drag-and-dropping the Workflow component from the Marketplace on the right side of the screen into the main editor:
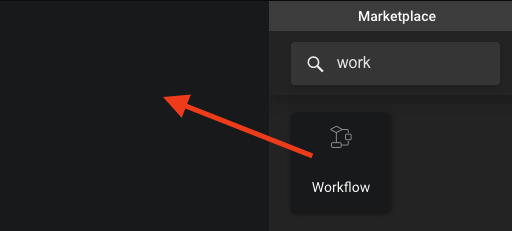
You can then rename it and double-click on it to open the workflow editor:
The Workflow editor looks like this the first time you open it. The State in blue represents the Initial State of your Workflow. There is always one so it is automatically created for you:
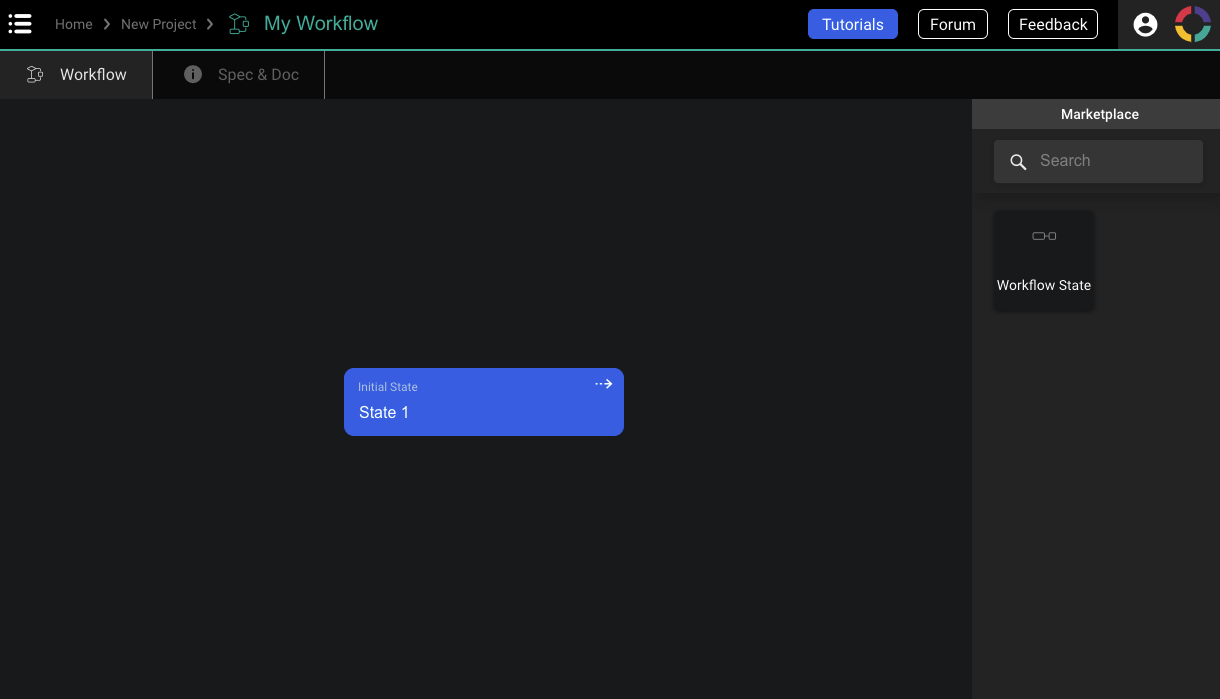
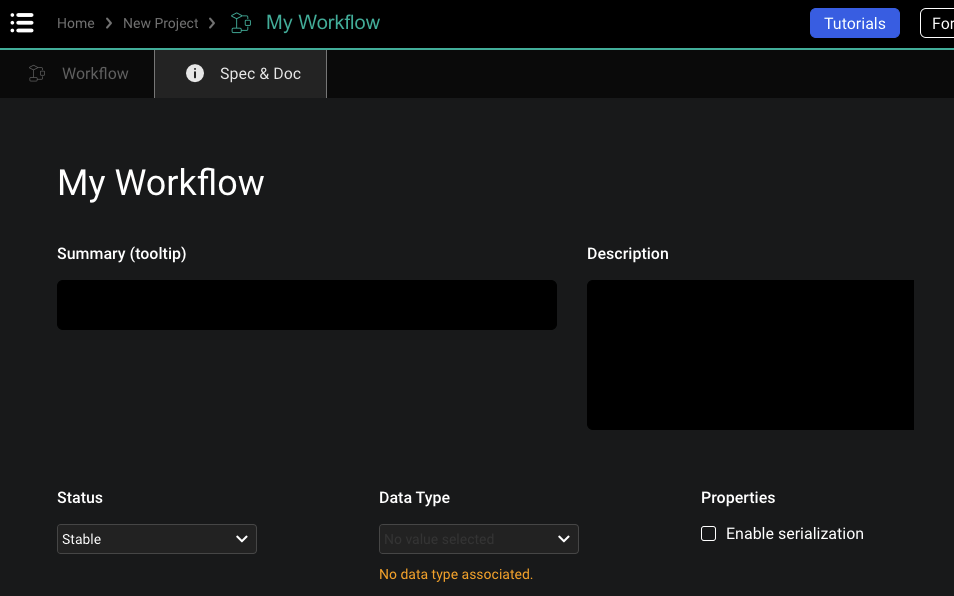
In the Spec & Doc tab you can give some information about your Workflow.
There is some configuration of the Workflow you need to do:
- Since Workflows are always associated to a specific
Data Type, you must specify it - You can or not enable the serialization of the
Data Typeinstances when using the Workflow
Even if the serialization of objects is disabled the Workflow will still historize the object's states, just without the object's values.
Define the States
You can now start creating and defining your Workflow States. Simply drag & drop them from the Marketplace:

To rename your State, you can select its name and give it the name you want:
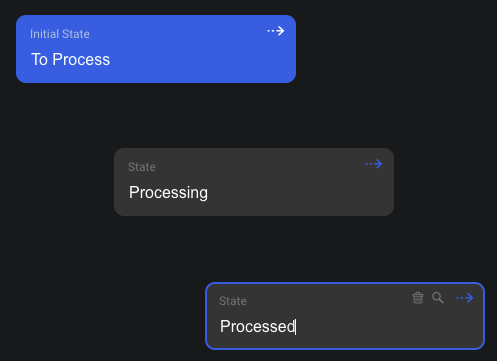
To delete the State or find its usages, just hover your mouse over it and you will see the options at the top-right corner:

Define the Transitions
Now that we have our States, we can start creating Transitions between them.
To do that follow those steps:
- Hover your mouse over the State from which the Transition starts
- Click on the arrow icon in the top-right corner and keep your button pressed
- Move your mouse to the destination State and release your mouse button
- The Transition is created!
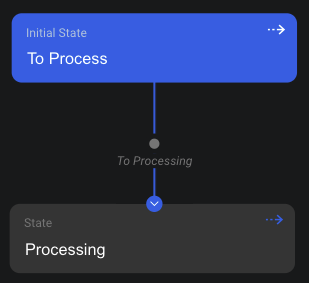
- The default Transition name is always
To <destination state name>. That's why renaming the States before creating Transitions may gain you some time. - You must hover the Transition to see its name. You can also hover the origin or destination State to see it.
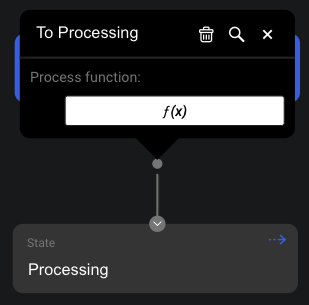
To rename the Transition, delete it or find its usages, simply hover the Transition and click on it:
Self-transition
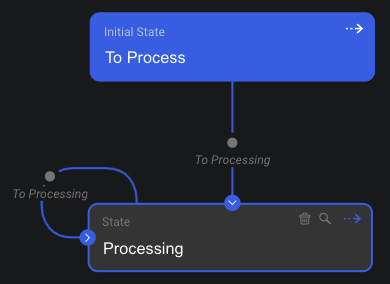
A Workflow in DRAW allows the creation of a self-transition, which is a transition with the same origin and destination State.
To create such Transition, follow the same steps as for creating a normal Transition but release your mouse button when it's on the same State:
Transition process function
You can define an optional process function on your transitions. This is useful to add logic on transitions, like sending an email, changing the object's properties, do some verifications, etc.
To do so click on the f(x) button in the transition popup we saw above. It will create an anonymous function following this signature:
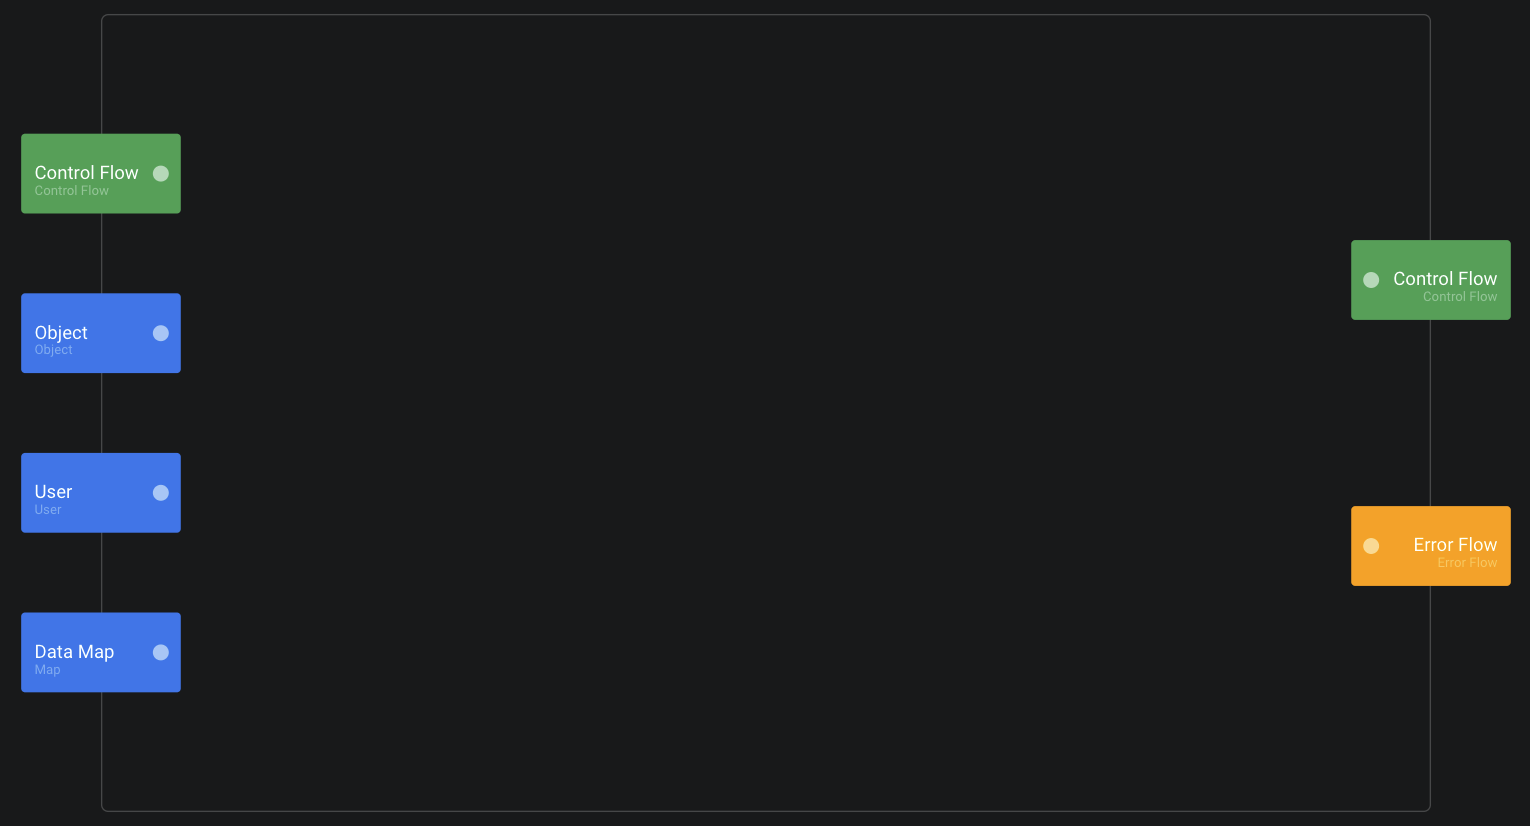
The inputs are:
Control Flow: triggered when the transition is triggered (but not done yet)Object: the object on which the transition was triggeredUser: the user triggering the transitionData Map: an optionalMapof data passed to the process function
The outputs are:
Control Flow: trigger it to finalize the transitionError Flow: trigger it to cancel the transition
When a process function is set on a transition, the little dot on the transition arrow appears in blue to quickly see it.
Using Workflows in DRAW
Below we show some very useful bricks when it comes to manipulate Workflows in DRAW.
All those bricks are defined in the Marketplace extension extensions/workflow, where you can find also another useful bricks.
All workflow-related bricks start with Workflow: to simplify search in the Marketplace.
The Marketplace content being editor specific, these bricks are available from the Function Editor or Action Editor.
Initialization of a Workflow
When creating an instance of a model associated with a Workflow, the Workflow is not automatically initialized on the instance.
To do that, you must explicitly use the brick Workflow: Initialize:
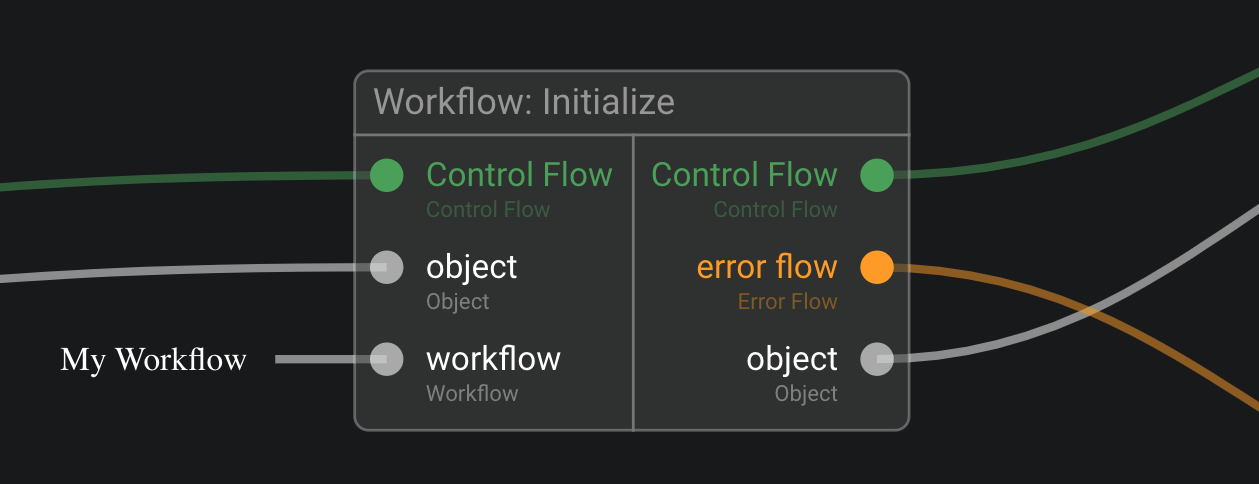
It takes the instance as an input and the workflow to initialize (since multiple workflows could be associated with the instance Data Type).
Once the Workflow is initialized on the instance, its current state is the Workflow's Initial State.
Transitioning from one State to another
To trigger a Transition (transitioning from one State to another), you can use the brick Workflow: Trigger Transition:
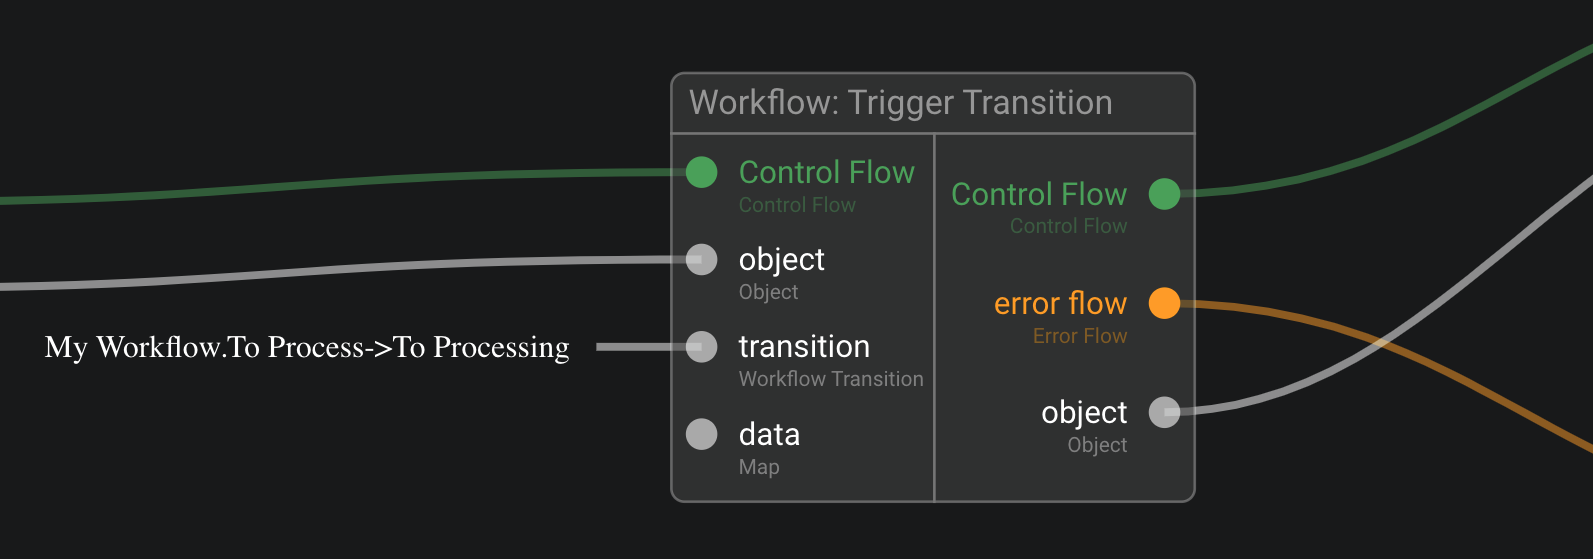
You must specify which Transition since the current State may have multiple outgoing transitions.
If the Transition has a Process function, it's automatically called by the brick before executing the Transition.
If the Process function returns an Error Flow, the Transition will fail and the error will be forwarded by the brick.
Note that you can pass an optional Map of data to the Process function.
Retrieving the current object state
To get the current object state information of an instance for a specific Workflow, use the brick Workflow: Get Object State:
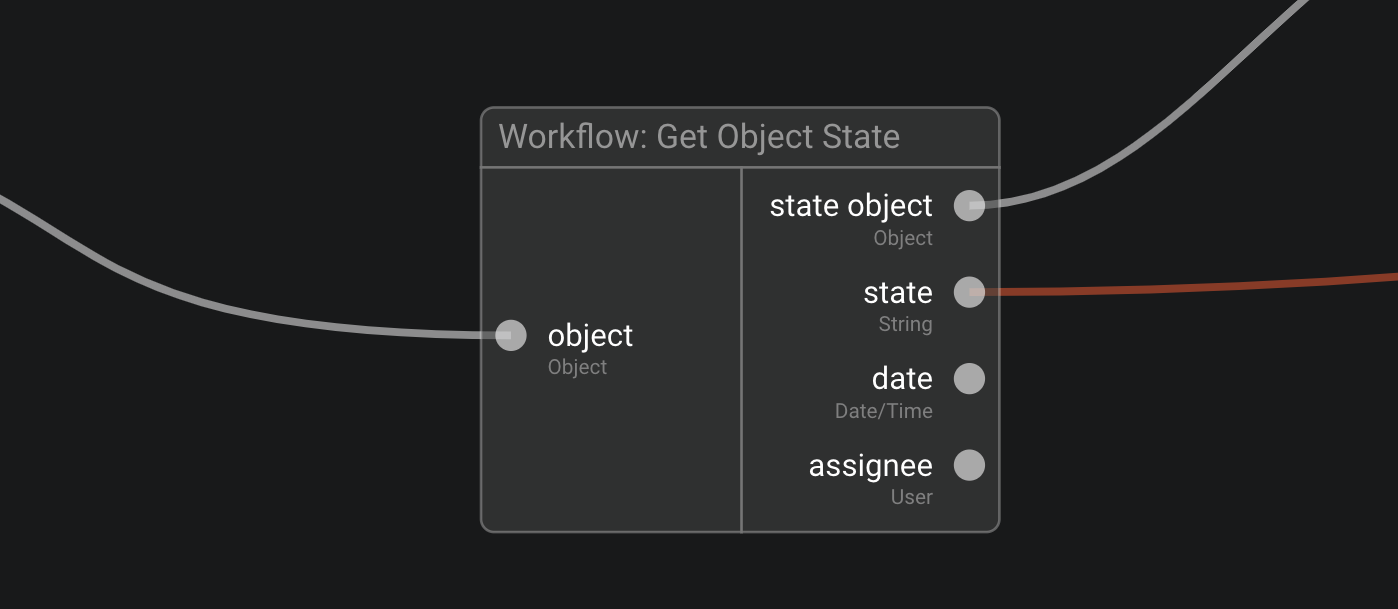
You get in output an object of type Workflow Object State on which you can get further information but also directly
the different properties that can be extracted of this Workflow Object State instance as a shortcut.
Check if an object is in a specific State
Often you just want to know if an instance is in a specific State. To do that use the brick Workflow: Is Object In State:

Get an object history
If you want not just the current object state but all the history, you can use the brick Workflow: Get Object History:
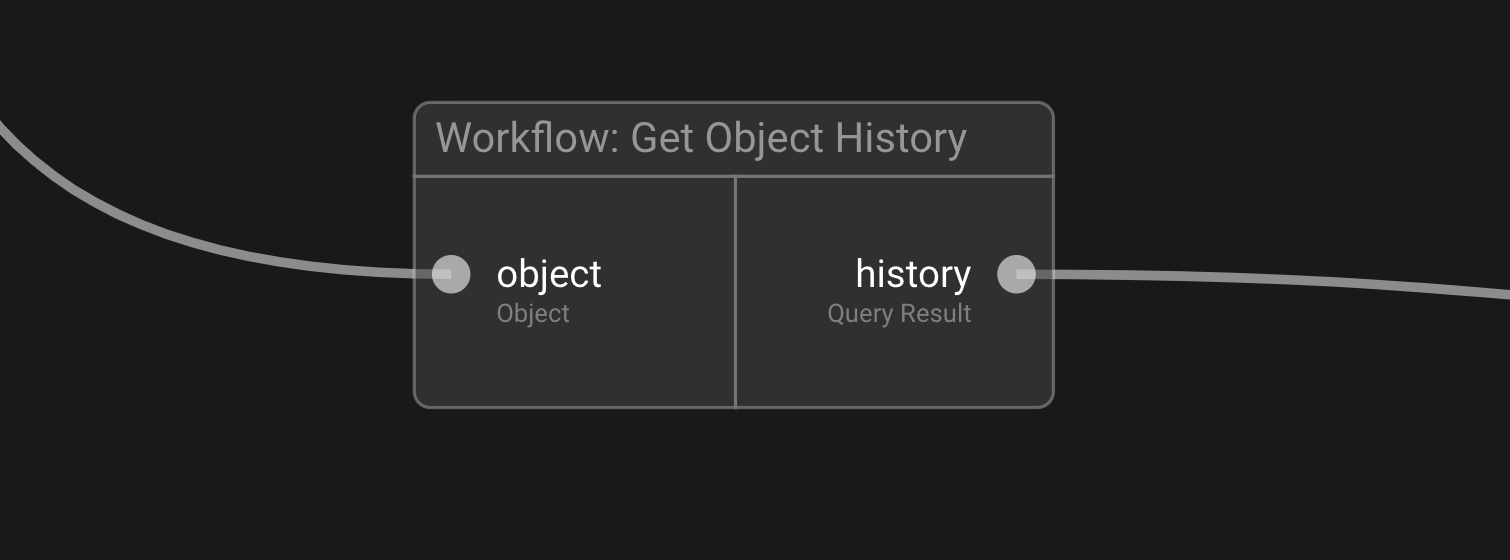
It will return a Query Result of Workflow Object State ordered by datetime (descending).
Using workflows in CODE
You can manipulate workflows in CODE too. This is very useful if you want to do complex logic on them or some logic very specific to your use cases.
To do that CODE exposes all workflow-related models in the Public API:
export class Workflow extends CloudObject {
    static serializationEnabledProp: Property<boolean>;
    static dataTypeRel: Relation<Workflow, CloudObject>;
    static statesRel: Relation<Workflow, WorkflowState>;
    static initialStateRel: Relation<Workflow, WorkflowState>;
}

export class WorkflowState extends CloudObject { /* empty */ }

export class WorkflowTransition extends CloudObject {
    static processRefProp: Property<Brick>;
    static fromStateRel: Relation<WorkflowTransition, WorkflowState>;
    static toStateRel: Relation<WorkflowTransition, WorkflowState>;
}

export class WorkflowObjectState extends CloudObject {
    static workflowProp: Property<string>;
    static stateProp: Property<string>;
    static assigneeProp: Property<string>;
    static dateTimeProp: Property<Date>;
    static serializedObjectProp: Property<string>;
    static objectRel: Relation<WorkflowObjectState, CloudObject>;
    static currentObjectRel: Relation<WorkflowObjectState, CloudObject>;
}
You can find the full documentation in the Code API documentation.
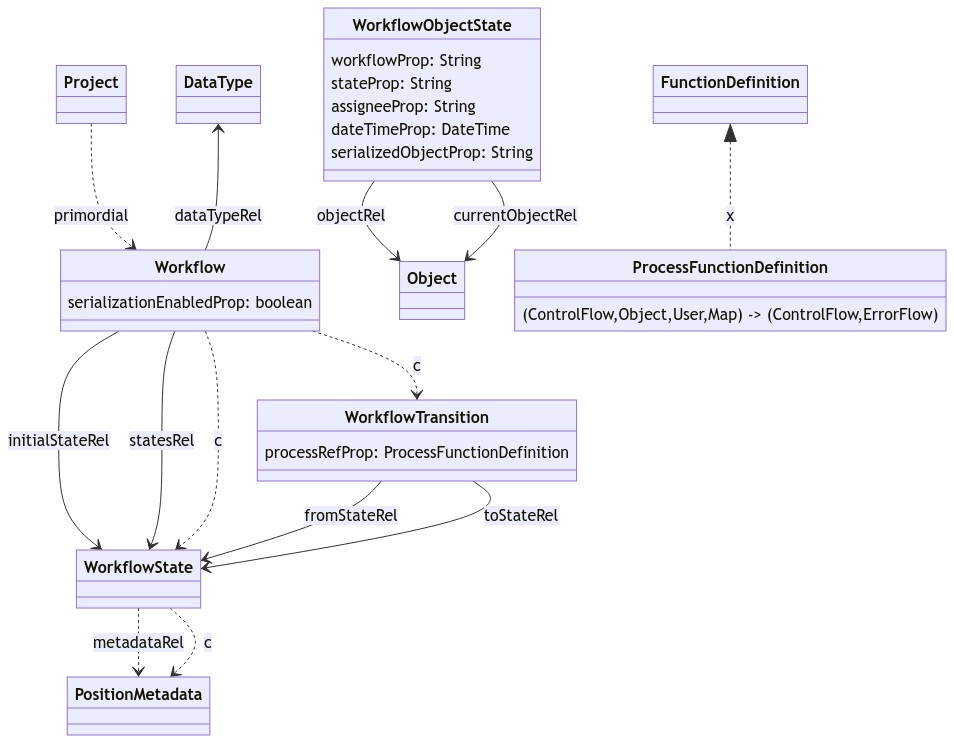
Data Model
Here is a diagram of each type and their properties and relations, as defined in the Public API above:
