Actions and Functions
Introduction
Hello again 👋
We are arriving at the end of those First Steps with Olympe!
(And we will finally be able to play our project game: Guess the Number!)
What? Already?
Yes :sad: But do not worry, more chapters will come with more and more advanced techniques and concepts 😉
And that said, and it may not seem like it but, we saw and learnt quite a lot already:
- How to setup an account on the Olympe Community?
- What are Function and their inputs and outputs?
- How to create an UI application with Visual Components?
- What is and how to use composition to be a better developer?

In this chapter we will go back in the Logic world and meet a good friend of Function, let me present you the great and amazing Action 😃
And what about the Data circle in the Triad?
I purposely skipped it for now as there were already a lot to say about Logic and UI. Also the Data "world" is a big one and will have a whole part dedicated to it. Actually it will be the next part and it is coming soon 😉
Okay let's jump into this chapter.. Action! 🎥
Actions vs Functions
As I just said in the introduction, an Action is very close to a Function in DRAW:
They both help us create the logic of the application, so why do we need both?
That's the questions we will try to answer in this chapter, why we need both? In which aspects are they similar? In which aspects they are different? And most importantly, when to use one or another?
We will create a small demo application. This app will do nothing crazy, but it will help a lot for demonstrating this Actions vs Functions similarities, differences and use-cases.
So let's start with that, create a new UI App called Actions vs Functions and make it look like that:

No need to be pixel perfect, this app is just for demonstration 😉
Set both Labels property With Format value to True.
Execution Difference
Instead of starting by the explanation let's switch around and do the example first, then we can make some observations out of it 😉
First make the Function Label.Text property dynamic and equals to Name Text Field.Value. To make things clearer we will use the function Format String so we now which label is which:

Secondly, in the Action Button.On Click event, we will set the Action Label.Text value using Set UI Property. The value will also be Name Text Field.Value:

(Notice this input Control Flow and the green pipe 😉).
Now I let you run the app and play around a bit, do you see the difference between the Function version and the Action one?

The Function Label updates as we typ in the Name TF, on the contrary the Action Label updates only when we click on the Action Button. It the when that changes.
This is the first and most important difference between both ways:
The function updates continuously.
The action runs only when an event occurs.
Control Flows
The difference in the execution is defined by the Control Flow input and output that are specific to Actions.
Control Flows inputs, outputs and pipes are shown in green in the logic editor.
Let's talk about those white and green pipes a little bit, I will use some schema to help us out.
This is the schema of the Function way (don't bother too much about the shapes):

The white arrows represent the white pipes. Those pipes are continuous, it means that when there is a value updates in it, it is directly send to the next brick in line.
Now let's see the action one:

First we can see that the logic in itself (taking the Name TF.Value and using the output of Format String) is exactly the same as for the Function.
However the when is controlled by the input Control Flow, it starts the flow of actions that are connected in line.
It is really easy to recognize Actions, they always have an input Control Flow and an output Control Flow too.
(There are some exception but in 99% this is true 😉).
Order Difference
Let's see another difference. To showcase it we will use a new action called Show Alert Dialog.
I let you change the Action Button.On Click to this:

Notice how I resized the left panel (Prop Picker) and the right one (Marketplace) to have more room for my screenshot. If you are working on a smaller screen like me, it is nice to know that this is possible.
Again, I ask you to test the app and check what is happening:

What the Show Alert Dialog brick does should be quite explicit: it shows an alert dialog 😏
We can now update our little schema, you can see that we used the Format String output two times:

The flow of the action logic first does the Set UI Property, and after it it does the Show Alert Dialog. It happens in a split second so it may be hard to see. To make this clearer let's exchange both:

Test this again and take a look at what is happening with the Action Label update:

Do you see it? It changed from Cédric to Benjamin only after the Show Alert Dialog finished.
And this is the second difference: Actions are run in order. The order is defined by the Control Flows 😉

Functions are not ordered. Whenever all the inputs have a value, and each time a value changes after that, then the function is run again and the outputs values are set. We can say that with Functions we are doing declarative programming, we say what we want but we don't care about how it happens.
With Actions however this concept of ordering is very important. How would we know when to show the alert dialog with Functions only? The answer is that we can not, that is also a use case of why we need Action!
Branching
We saw that with Actions we can run bricks in a defined order A -> B -> C, and that the when it starts is defined by the input Control Flow (the pulse that is given by the On Click event in our case).
Now how can we control this execution flow more finely? How to do A -> B if something is true and A -> C otherwise? To explore that I let you add a Checkbox in the screen like this:

In the Action Button.On Click let's discover a very important action called Branch Control Flow:

A brick with two output Control Flows?
Yes that is possible 😉 If you check out the documentation it should be clear what this brick does. Basically if the input condition is True when the input Control Flow is triggered, then the output True Flow is triggered. And if the input condition is False when the input Control Flow is triggered, then the output False Flow is triggered.
This allows us to create more complex logic depending on some condition. Here we only show the alert dialog if the Checkbox is checked. And we only update the Action Label when the Checkbox is unchecked:

You can see this behaviour by testing it, this is what you will see:

We call this branching, we follow one path or another. We could also see it as a split in the execution flow. The Function equivalent would be the brick If.
Joining
We just saw how to split our execution flow, now we will see how to join them back again 💓
Let's say that we want to show the alert dialog only when the Checkbox is checked and if the user clicks OK we update the Action Label. And if the Checkbox is unchecked then want to update the Action Label directly.
The action we need now is called Control Flow Multiplexer:

Notice that I changed the Cancel Text input value too! Also I use the On Confirm output Control Flow.
Schematically we are doing this:

This Control Flow Multiplexer brick triggers its output Control Flow whenever one of the two inputs Control Flow are triggered. With this we effectively join back our two execution flows 😉
By setting a value for the Cancel Text input of Show Alert Dialog the dialog will show two buttons (Cancel and OK). From this it should be clear why this brick has three outputs Control Flow!
And this is the result:

Control Flow Multiplexer is only one example of brick that join back various execution flows. Another examples are Synchronize Events and Combine Latest Events, check out their doc!
On Load
Until now we only saw execution flows that are started by an event that is triggered by a user interaction with the application, in our case it is the Action Button.On Click.
But this is not the only type of event that can occur. One very useful and used event in the UI side is called On Load. This event is triggered when the screen or component is loaded 😉
It allows us to initialize some state (a property for example) before the user can do anything, and to also do something only once.
Where is this On Load event for our Home screen? Go ahead and enter it:

We will go a little further with the Show Alert Dialog brick and this time we will ask the user name directly when the application loads. Add this logic with the TextField Type input set to text, notice that we dispatch (trigger) the Action Button.On Click event at the end:

What are we doing here?
- We ask the user his or her name with the alert dialog.
- We set the Name TF.Value with the name.
- We dispatch the Action Button.On Click event.
- This means that we run this event ourself, it is like a simulated user click.
- It allows us to reuse the logic done there without doing it again.
If you test it out it should look like this:
(You need to refresh the tab to trigger the On Load).

In DRAW if you enter the Home screen now, you will see the alert dialog there too! That is because On Load is also executed in DRAW. This can be alright, but not in our case.
DRAW provides a brick to solve this, it is a brick called Execute on Runtime Only. It triggers its output Control Flow only when running the application and not in DRAW. Check out this gif to see it in action:

Logic Composition
In the last chapter we saw how to use composition for UI and we also did it earlier with functions. Of course this is also possible with actions 😉
We will create a custom action called Ask for Name to handle our little logic in the On Load. I will us a new brick called Default Value to solve the case when a user does not enter any name.
At this point we will not discuss too deeply about this section, I let you watch this (long) gif and try things on your end!

When you create a custom Action, you automatically have an input and output Control Flow 😉
Recap. and Conclusion
That is it for this shorter chapter about Actions!
Let's do a recap and answer the remaining questions that we asked ourself at the start about Actions vs Functions:
In which aspects are they similar?
- They are both in the Logic side of the application.
- We use both inside the Logic Tab and we can mix them together.
In which aspects they are different?
- Functions are executed continuously, Actions are executed when the Control Flow is triggered.
- Actions are executed in order, this order is defined by the Control Flows.
When to use one or another?
- We use Functions when we can use declarative programming, whenever we have inputs values and we now what outputs values we want. A common use case is dynamic UI properties.
- We use Actions to do some logic only when a specific event occurs. It can be on a Button On Click event or on a screen On Load.
- A more advanced concept: Functions should be pure (not mandatory but recommended), for a given set of inputs, the outputs should always be the same. Actions however allow us to do impure computation: async requests, user inputs, execution flow that may fail, and so on.
Thank you for reading 😃
Project Practice
We have now everything that we need to finish our game project!
What is missing is the actual game logic, and for this we will use what we learnt in this chapter.
As always, try to do the exercise by yourself before checking the solution 😉
Generate a Random Number
First we need a random number between 1 and 100 (inclusive), indeed the game would not be very interesting if the number to guess is always the same 😁
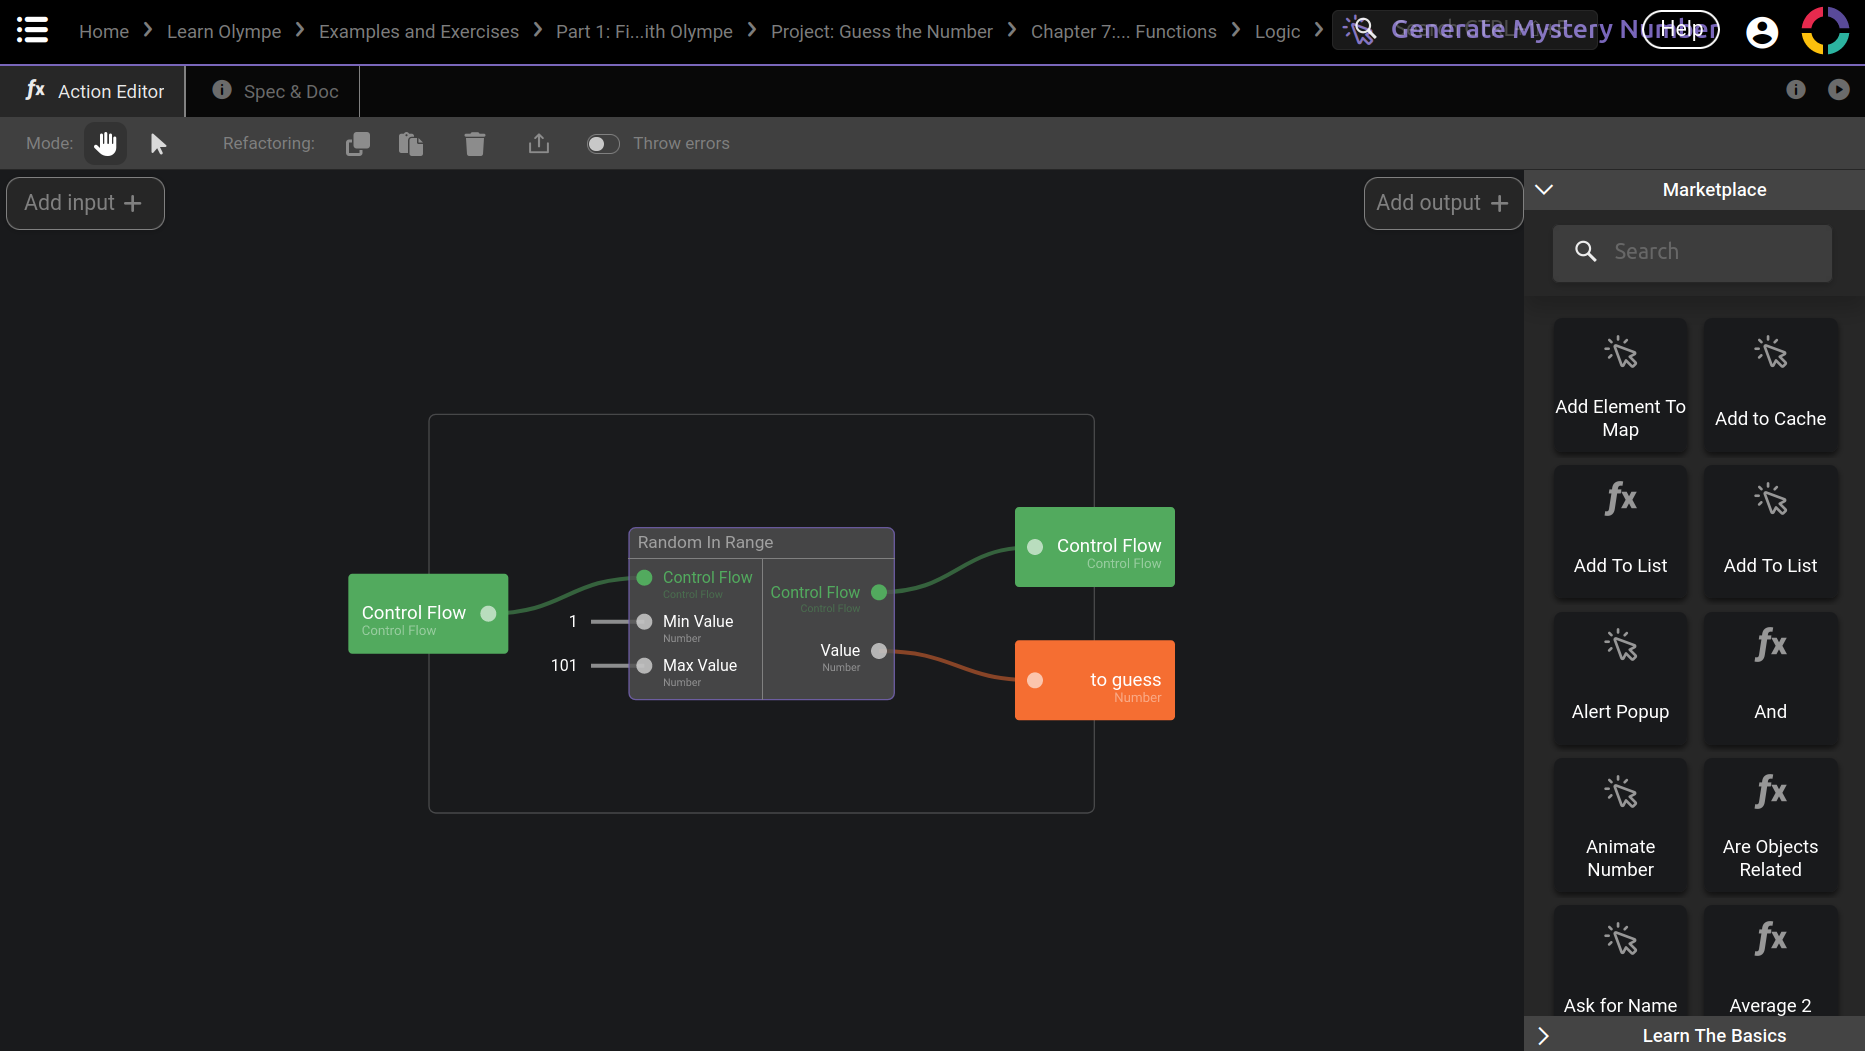
DRAW provides a brick to do just that: Random In Range
Go ahead and create a new custom Action called Generate Mystery Number, it should return this random number in an output called to guess:
Generate Mystery Number Solution
Now we need to use it to initialize the to guess property in the Play Screen.On Load:
Play Screen.On Load Solution
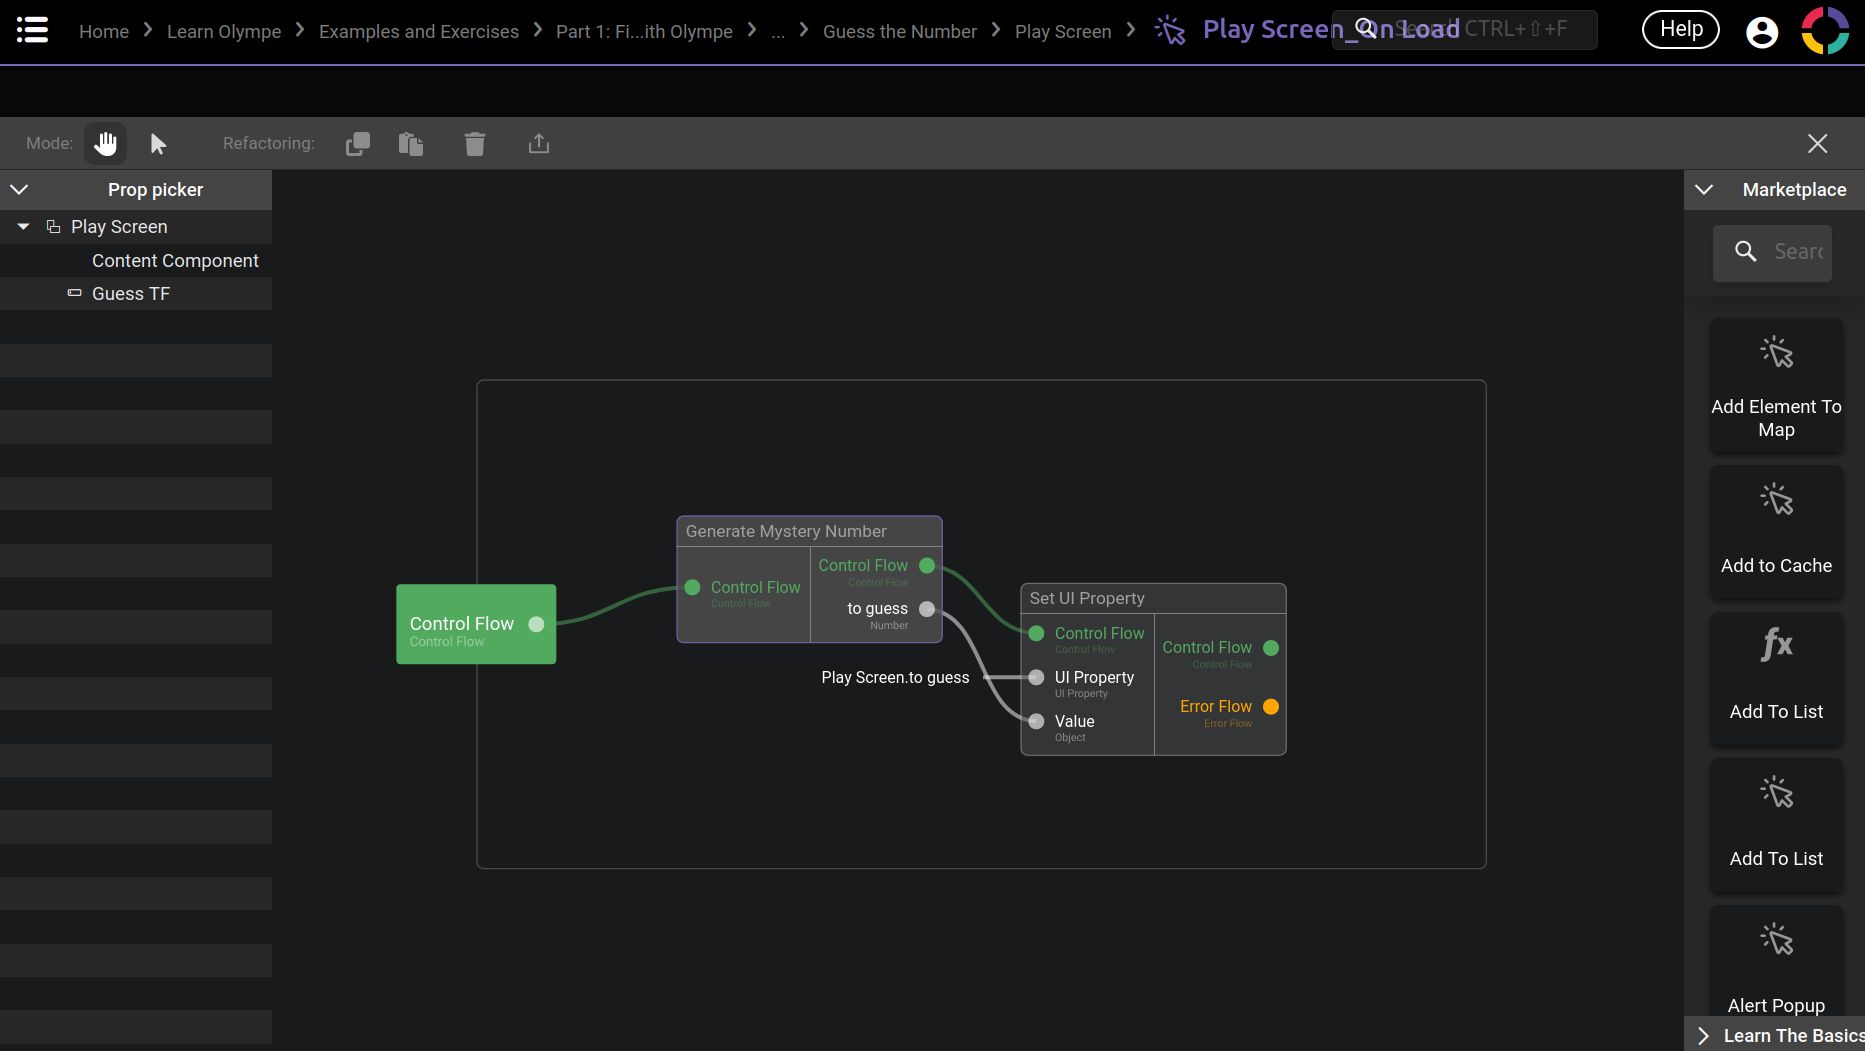
Good, now each time the player enters the Play Screen the to guess property will be random!
Win/Loose Logic
Now the big boy: the Content Component.on action clicked event!
This event will contain all the win/loose logic of the game.
Since the player has 10 attempts available, at each guess we need to reduce this number by 1. Add just that for now:
Reduce Available Attempts Solution
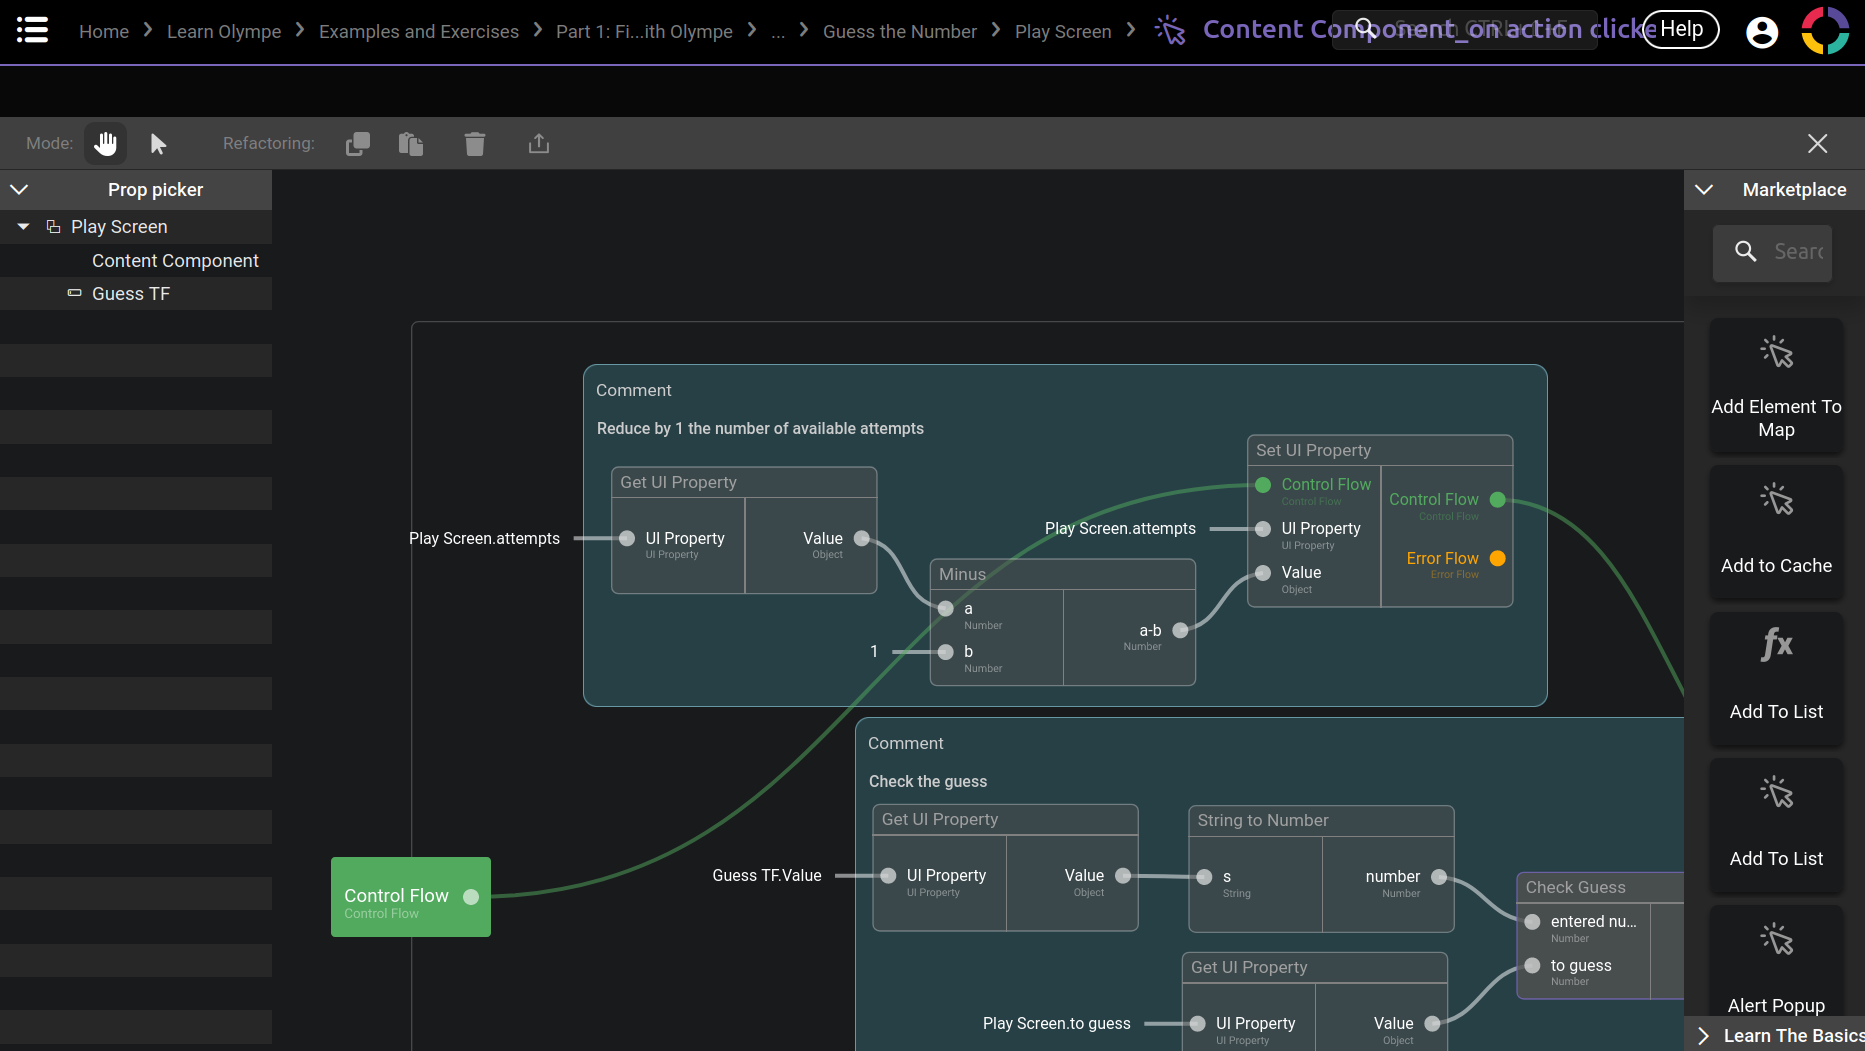
Now we need to check whether or not the guess is correct or not, and we will branch to different flow depending on it:
Check Guess and Branching Solution

We know if the guess is correct or not now. If the guess is right, we can move the player to the Win Screen. Else if the guess is wrong, we can update the hint given to the player:
Win Logic and Hint Update Solution
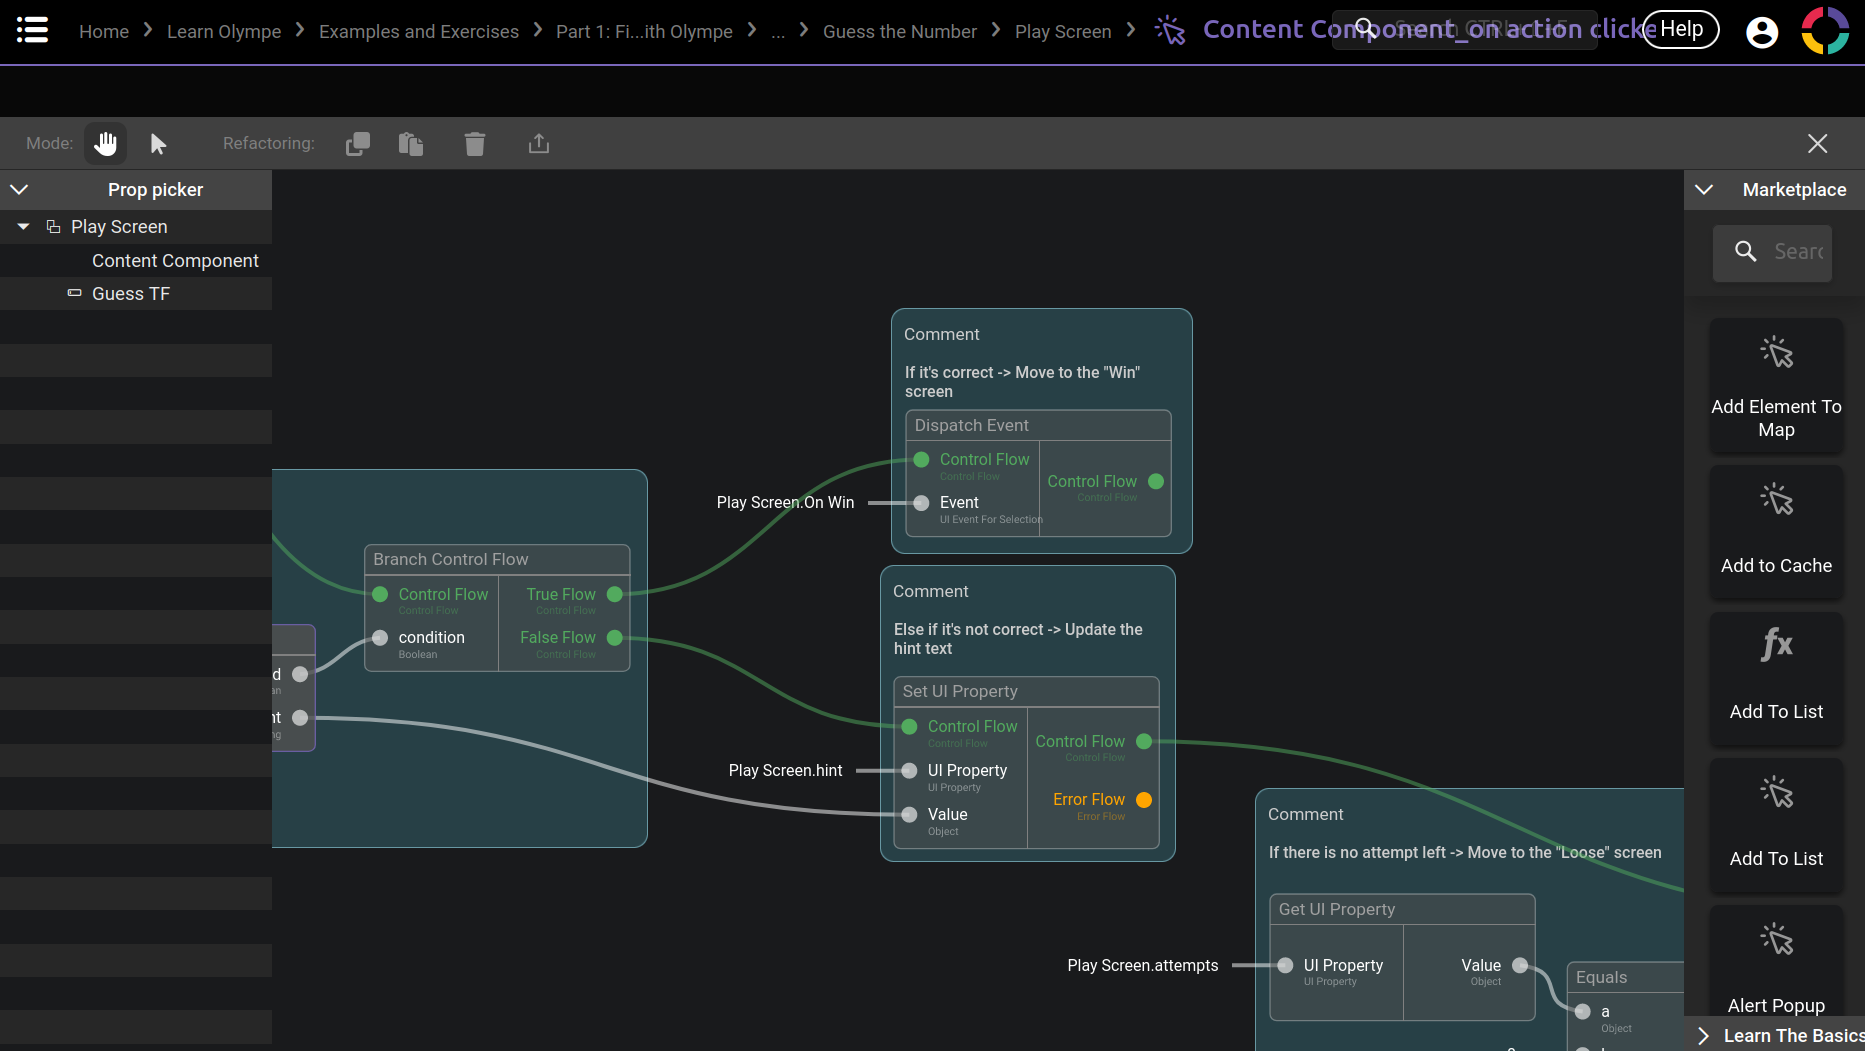
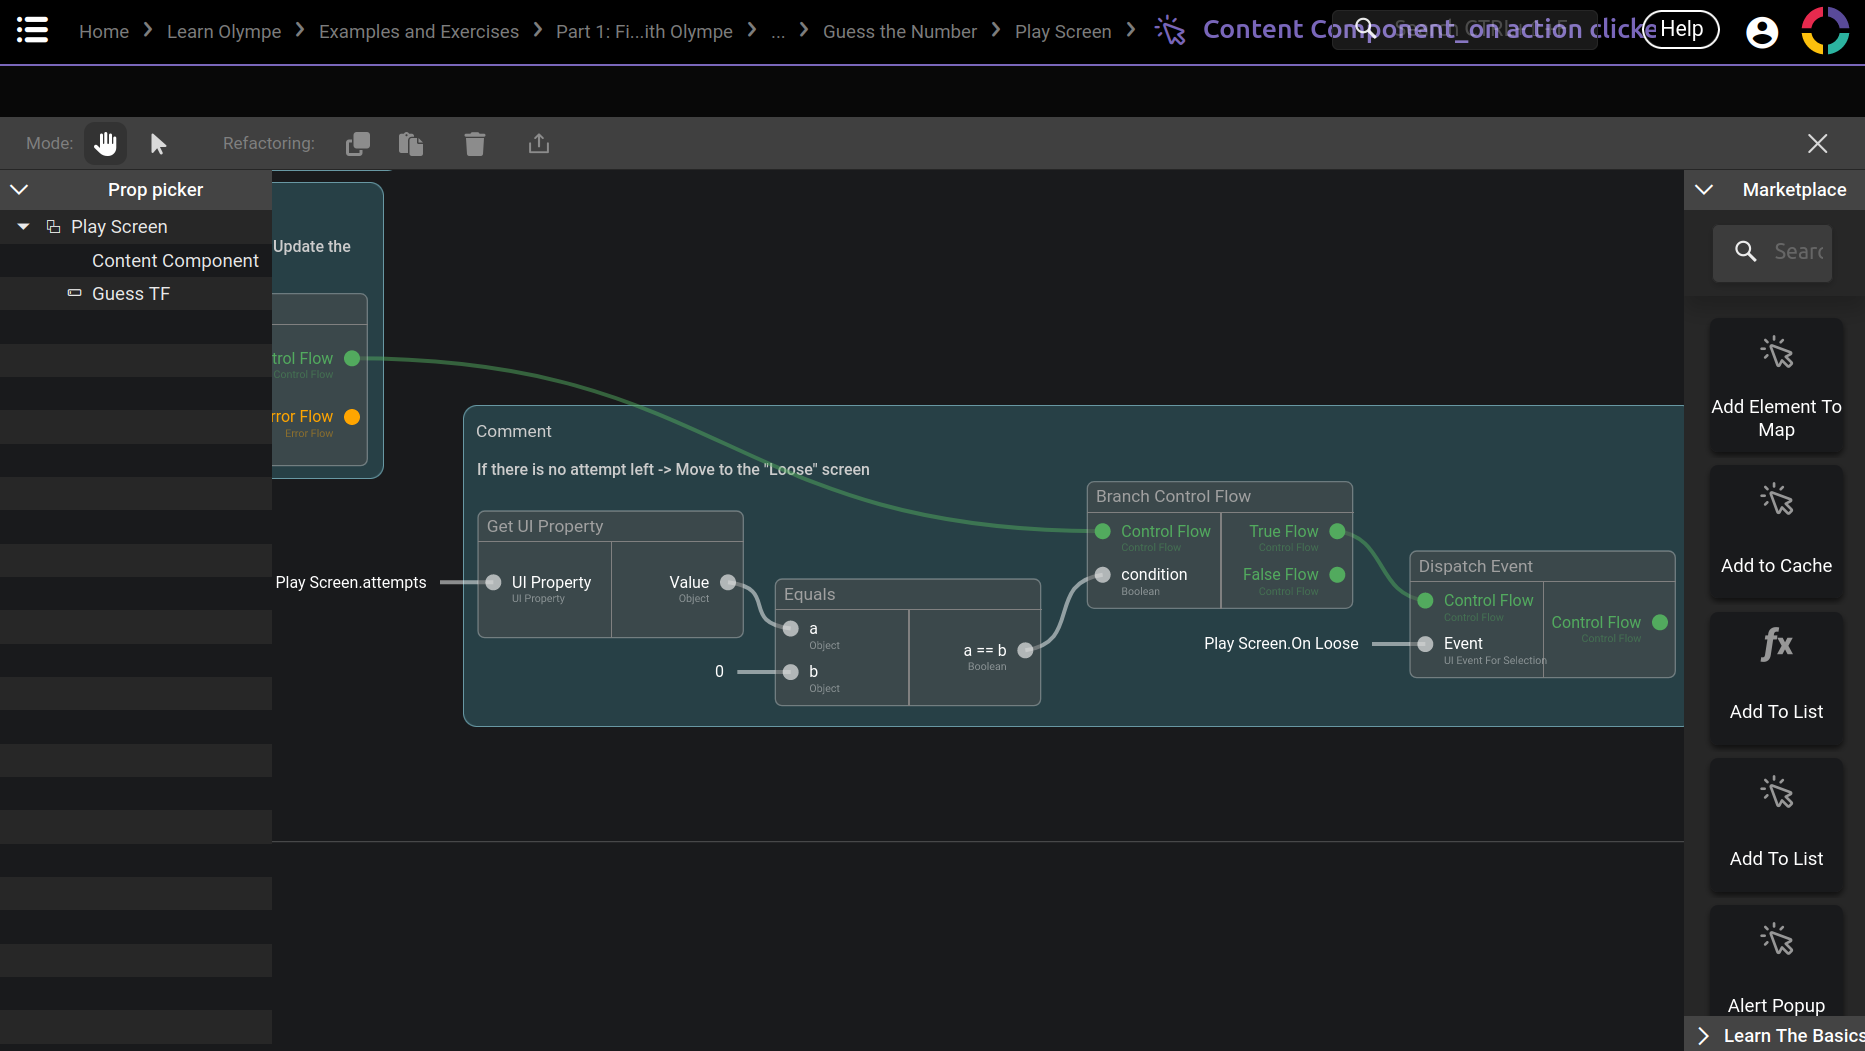
Last we want to player to move to the Loose Screen only if there is no attempt left:
No Attempt Left Solution
Let's Play!
Congrats! 🎉
The game is now ready to be played by you and anybody you send the app link to 😉
In this gif I demonstrate both result (I speedran to the loose):

We are now done with this project, it is a simple game but I hope it shows what we can do with what we learnt with those First Steps with Olympe! Now don't hesitate to create your own tools and games with it 😉
Of course we still miss some concept of Olympe to bring our application to the next level, notably the Data side!
But I can tell you a little secret 😇 : it will be the subject of the next part!
If you want to practice with Guess the Number! more, here are some ideas for improving it:
- Clear the TextField at each guess, so the player doesn't need to do it.
- Add difficulty levels in the Home Screen, it would change the number range or the number of attempts.
- Rework the Content Component to make the game more visually appealing.
- Disable the guess button when if the player did not enter any number yet.
- Allow to use the ENTER key to guess in addition to the button (use a dispatch in the On Enter Pressed event).
- Any improvement that you may think of 😉