Types, Functions and Values
Let's do some Logic!
Now that you have your Community account and you created the famous Hello World! as a first app, let's dive into how we can create more complex and useful applications with Olympe. The real journey starts here and now 😃
Check out this schema:

I like to call it the Great Triad of an App, what represent each circle exactly?
1. UI or User Interface
It is the visual aspect of the app, how it looks to the user. If we think of a restaurant for example, it would be how it looks like, its colors, how the tables and chairs are laid out. The Hello World! app we did is purely UI too, it just shows something to the user. While an app can be full UI only, like for a landing page, it is often not enough and that's why need the two other circles of the triad.
2. Logic
As-is our restaurant looks great and the kitchen is amazing, but it is still not enough for having a business that brings a lot of customers. It is just a beautiful but empty shell, indeed we don't have anything functional in it! The logic is here for that, it is what bounds and brings to life everything: the electrical network to heat the oven and turn on the lights, the water that comes out when opening the tap, the cooks that transform the ingredients into flavorful dishes.
DRAW comes with a lot of out-of-the-box logic for us, we won't actually need to setup the electrical and water networks ourself. But the logic allows us to create unique features and interactions with the users, like the dishes recipes in our example. Logic is a vast subject and really the root of all application.
3. Data
To finish off the restaurant example, this would be the raw ingredients used and where there are stored. It could also be the actual water that flows in the pipes and the eletrons that travels to the lights. Data is... well... data. In real-world application it could be the user account (name, email, age), the articles in a shopping basket, etc. This is also a big topic and we will explore it later on.
I tried my best to briefly explain the Great Triad of an App. What you should understand out of that is that we can create applications by using one, two or all circles of it. But more often than not we use the three, and we will explore each of them progressively.
In the last chapter we created a full-UI app Hello World!, we will talk more about UI in the next chapter.
In this chapter I want to introduce a very basic grounding of Logic. It will be a bit less visually impressive but since it is really what brings an app to life, it will serve a lot trust me 😉
Did you say Function?
Okay so how about we do some logic now? 😃
The simplest way to approach this is by making Functions, but what are they?
A Function is like a black box, it takes inputs and gives back outputs.
The outputs being a result of some logic done on the inputs:

We can see them the same way as we would for maths: f(x) = x + x or y = x + x
Here with x being the input, y being the output, the logic is x + x and f is the function name.
Another way of seeing inputs and outputs is that an input takes a value and an output gives a value.
Let's see how to create the same in DRAW by first creating a function, in a new project for good measure:

- Create a new Project called My Exercises (I did a typo in the gif 😬).
- Get into the project, then from the Marketplace: create a new Function, call it Double (also I used a wrong name in the gif 😬😬).
- Double-click on the freshly created function and that's it!
The Function Editor
We already encountered quite some editors until now: the Repository Editor and the Project Editor (the Folder Tab to be precise). And we quickly used the Screenflow Editor and the Visual Editor.
So it should not be a big surprise that we are now in a new editor! Let me present you the Function Editor:

- As for the Project Editor, the Function Editor is composed of multiple tabs, namely the Logic Tab and the Spec&Doc Tab. The first one is where we build the function itself, the logic of it. The second one serves to define the specifications and documentation of our function, it is an important one too and we will see it in a short time.
- The Logic Tab comes with this toolbar. Those are common tools, like the famous undo/redo, that will help and accelerate the usage of the tab. We will discover them over time.
- These two buttons allow us to test quickly the function. One is for testing how the documentation looks like and the other one is to test the actual logic. Right now if you click on them you will see empty popups as our function contains nothing.
- This is the main part of the tab, we will build the logic here!
- This one you should know by now, raise your hand if you recognize it ✌️ Yes it is the Marketplace again!
- These two buttons are for adding input and output quickly. I will in fact show you another way of doing it, which I find personally more powerful, but it is good to know that these two exist.
The Marketplace, again!
And it is not the last time! As you can see there are quite a lot of tiles in it this time, way more than for the other editors. Do you remember what we said about the content of the marketplace? Its content depends on the current editor (or tab) that we are in! And in our case, since we are editing a Function, the Marketplace shows us other functions that we can use 😉
But wait I see two different icons, is that normal?
Indeed if you look at the previous screenshot, you can see that 5.1 and 5.2 are different. 5.1 is the icon for Function (fx) and 5.2 is the icon for Action (pointer). For the moment we will only use Function.
Let's talk a little bit more about the Marketplace, it is one of the most important part of DRAW after all!
1. The tiles are actually called bricks
Until now I always talked about tiles that are in the Marketplace. In the Olympe world, those are actually called bricks. Like the Lego bricks that you use to build a colorful small (or big) house, the Olympe bricks are used to build applications (big or small too). There are many types of bricks and we will discover them along the way 😉 From now on I will stop using tile as a name and start using brick instead.
2. You can search in it
We already did it, but I think it's good to say it again. The search feature is very useful, especially when the Marketplace contains a lot of bricks like here in the Logic Tab. What to search is another topic, and it can be quite a challenge when using it for the first times. This will become much easier with practice and as your knowledge grows.
For our first example f(x) = x + x, go ahead and search for the brick Plus and drag-and-drop it in the editor main area. This brick takes two inputs (a and b) and gives back the result of a + b as an output.
3. All bricks have documentation
How do I know that the Plus brick is the correct one? And that it does an addition?
Maybe you saw it, but when you hover the brick in the Marketplace or in the editor area, you see a little ℹ️ icon. When you click on it it opens the documentation popup, you see there the description of the brick and its inputs and outputs (name, type and description). This is very useful when exploring the Marketplace for a specific brick, it also tells us how to use it.
Check out this gif that resume what we just discussed, and try it yourself!

If you hover without moving for at least two seconds a brick in the Marketplace, you will see a brief description of it.
If you want to know more, use the little ℹ️ icon.
Inputs and Outputs
Now that we have the Plus brick into our Function, we need to add an input x and an output 2x (remember we want to do f(x) = double(x) = x + x = 2x). Go ahead and click on the Spec&Doc Tab, let's have a look at it:

1. This is the name of the brick (the Function in this case), you can edit it from here too.
2. In this field we can write a brief summary of what the brick does (it will appear when hovering the function in the Marketplace).
3. Here we can write a more in-depth description of the brick: what it does? how to use it? etc.
These fields are optional, we don't need them to create and use our function. However it is a good practice to start with them when creating a new brick. Why? Because it brings many advantages: firstly it will help us (the creators of the brick) to already put our mind around what the function should do, secondly it will help anybody what would want to use the brick later (in one day or in three years) to understand what it does and how to use it 😉
For sure our little example is quite simple, but still let's do it the right way and try out the documentation preview at the same time.
I let you check this gif:

Let's continue the discovery of the Spec&Doc Tab.
4. This two fields Status and Visibility allow us to share our brick with other people, right now we will not use this feature so let's skip it for the moment.
5. This is the Inputs area, it is where we will be able to create new inputs for the Function.
6. Same as 5., but for outputs.
Okay, let's create one input and one output by clicking the +New buttons and zoom in on what we got:

Since it's almost the same for inputs and outputs, I will only explain for inputs to keep the text shorter 😉
- The Rank (or order) of the input. With only one there is nothing special to do, but if you try creating more than one you will see buttons appearing. These buttons allow to re-order the inputs.
- The Name of the input, more on this just after.
- The Type of the input, as the title of the chapter would suggest we will talk about it soon 😉 For now just keep in mind that the default type is
Stringand we will needNumberfor our Double brick. - The Default Value is, well, the default value of the input. This field is only available on inputs and not on outputs. We will talk about it when we see the types.
- As for any brick, an input can have a Description that helps to know what the input is.
- These three Actions (Find Usage, Copy Tag and Delete) are for more advanced usages (refactoring, tag manipulation), for now we will not need them. You only need to know the Delete action which remove an input.
Now we can define what our input and output are.
You can try it on your own 💪 and check the gif afterward:

When speaking about inputs and outputs you will often see IO (shortened from: Inputs/Outputs).
It piping time!
Okay now that we have defined our input x and our output 2x, we can go back in the Logic Tab.
You should see a change from what we had before, the input x is on the left in a blue-ish colored box and the output 2x is on the right in a red-ish colored box.
We have everything that we need for the function double(x) = 2x = x+x, we just have to connect our IO with the Plus brick that we already have in the logic.
In the DRAW world we call the connection between a set of IO a pipe, a tunnel that transfer the value of an output to an input. Let's connect our function and I will explain what's happening afterward:

If the gif is not clear, here is what I'm doing:
- Hover the mouse on the connector (little dot)
- Press the left button of the mouse and keep it pressed
- Move the mouse over the desired connector
- During this process you can see the pipe preview
- Release the left mouse button when the pipe is correct
To delete a pipe, hover it with the mouse and long-press with the left mouse button. The pipe will shine and be deleted on the mouse button release.
The first test
Before the explanation, let's test our Double function shall we?
For this we can use the Run button right next to the documentation preview button, it will open a popup in which you can insert any value for x. And it will show the result of our logic (x+x) in the output 2x:

As simple as that 😉
But when you test and put for example a 3 for the input x, what happens exactly?
I guess it's time for an explanation! 📖
Pipes and IO
Let's dive a bit into how those IO and pipes works. For the example, I will take 3 as the input value for x.
Take a look at this amazing screenshot that I masterfully edited (okay maybe I'm a bit overconfident here).
No need to understand it yet, we will decompose it together:

There are quite a lot to say, I will try to split each concept, starting from simple first:
- The direction of the logic is left-to-right, like in english. The arrows in the screenshot shows this direction.
- The brick inputs are on the left, the outputs are on the right. You can see it on the Plus brick, with the purple vertical split shown.
- The small dots are the IO connectors, they allow to create pipes. Connectors and pipes are shown on the screenshot.
- A pipe defines the value of an input from an output. If an output is equal to 6, then the connected input has a value of 6 too.
- We can only create pipe from an output connector to a input connector, and it is the only possible way!
- This is shown by the
O -> Iin the screenshot. - Remember: an output gives a value, an input takes a value.
- This is shown by the
- An output can go to multiple inputs, but an input can take only one output.
- The connector on the
xinput is actually an output connector. The input value comes from the outside of the brick, a.k.a. from the brick that itself uses the Double brick. But inside the Double brick this input value from the outside is actually usable via an output connector. - The same is true for the
2xoutput, the connector is an input connector. The output itself is used outside the Double brick.
These last two points may sound a bit tricky, but if you look at the screenshot it may help to make more sense.
Now what happens exactly when we use the brick Double (in the test popup for example), and put 3 as an input value?
- We set the value 3 in the input connector of the input
x. - The output connector of the input
xhas then the same value 3. - This value is passed to the two inputs
aandbof the Plus brick, via the pipes. - The Plus brick does its internal logic and set its output to 6.
- This value is then passed to the input connector of the output
2x, via the pipe. - The output connector of the output
2xhas then the same value 6.
This input/output connectors story is probably more complicated. If you feel like this, just continue as you don't need to know it to create function. However I think it is nice to have a bit of under the hood explanation too.
Exercise: Another version?
This Double brick allowed us to see quite a lot of things isn't it? But there is one last thing I want to show you, or to be more precise I have an exercice for you 😈
You will see it's quite simple, right now we have the logic double(x) = x+x.
But I ask you to replace it to have double(x) = 2x 😉
As for many things in software development, there are often a lot of different solutions to the same problem. Most of the time there is a better solution, but in our simple case (the Double brick), both solutions are good. And it's also a good time for you to practice!
I will just give you those few hints:
- You can start by deleting the Plus brick
- The brick for multiplication is called Multiply
- To set a constant value on a input, just click on it (I let you try 😜)
I really invite you to give it a try 💪 And if you are blocked or if you want to check your solution, then you can check the gif:
Double brick: Multiply version solution
Names, Types and Values
Until now you must have read two words quite often: type and value.
And now it is the time to speak about them 😃
Each input or output we defined so far also always have two mandatory properties: a name and a type.
Let's start by where we can see all those:

1. All IO have a Name
The name of an IO serves to know what it does, and it also help to distinguish each others. The name should be as useful and understandable as possible, but without being too long neither. Deciding how to name things in developpement is a big topic, and there are as many opinion as there are developers. In DRAW however we have a possibility that doesn't exist in many other languages: we can use spaces in our names, so we don't need to rely on snake_case or camelCase naming convention.
With this space possibility, here is the main naming convension that I use, which is close to most Olympe developers:
For bricks: use a capital letter for each word, but not mandatory for link words.
Good:Cloud Objects to Excel,Compare Strings,Create Color
Bad:cLoud OBJECTS TO eXCEL,compare_strings,createColor
For IO: use only lowercase letters, with spaces between them, do not repeat the type.
Good:encoding,condition,background color
Bad:Encoding,boolean condition,backgroundColor
Since this is only a convention, beware that you may and will encounter different naming convention among various bricks. Note that it is also possible to use symbols ([]-,.<>/*() etc.) in names, and it can be actually quite useful too 😉
2. All IO have a Type
With its name, the type of an IO is the second piece of information that helps in the understanding of its usage. The last piece of information being the description, but this one is not mandatory and the developer of the brick may have forgotten it 😭
The type tells us what kind of value the IO can take. Until now we only used the Number type, and it meant that the inputs and outputs can be a number value only (1, 2, -4, 3.14). The type also tells us what kind of operation we can do with the value, we can do algebraic operations with Number, but it is not true for all types as we will see.
This is useful because it helps use understand the brick and its IO better. And because it avoid mixing types together. Let's imagine our types are Fruit and Meat, and the IO are like baskets. In the basket of type Fruit you can only takes (or gives for an output) an apple or a banana for example. If you connect a pipe between an output of type Meat to an input of type Fruit, it would not make any sense, and DRAW will tell you that something is wrong.
In this chapter we will discover three very useful types: Number, String and Boolean 💪
3. All IO may have a Value
As we just say, the type of an IO defines what kind of values this IO can gives or takes. Additionnaly to that there are different kind of value too. In the screenshot above you can see the input b of the brick Multiply is a constant value (the value is 2 in this case), this means that the value is set in stone and will never change.
The second kind of value are dynamic values, those are easy to spot as each pipes is a dynamic value, this means that the value is not known in advance and can change dynamically during the execution of the application.
I also wrote that all IO may have a value, indeed their is a third kind of value which is: no value.
In the Olympe world we call this special case the null value, we will speak about it later on 😉
Exercise: The Type Number
Okay so let's start with the simplest type of all: Number
It is pretty self-explanatory, it means that the IO value can be any numbers. This includes negative (-45) and positive (12) numbers, and also real numbers (7.426).
To put this one in practice, alongside with everything we learnt so far, I have an exercise for you!
As for any exercise, I will give you the statement with some hints, then try to do it be yourself, and I will put the solution (as a gif or text) right after. Also I may add a bonus part for those who want to try an harder version 😉
Exercise: Average of two numbers
Statement: create a new brick called Average 2 that takes two inputs a and b of type Number, and returns one output average of type Number.
Hints:
- Start by writing the the descriptions in the Spec&Doc, it is always a good start
- You already know the brick for addition, but you will also need the brick Divide
- The average is calculed like this:
average(a, b) = (a+b)/2 - Use the Run button to test out the logic
Solution:
Average 2 brick
Bonus question: The 2 in the name Average 2 means that is does the average of 2 numbers, this is a pretty common naming convention in DRAW. For this bonus question I ask you to create an Average 3 brick that calculates the average of 3 numbers a, b and c. Since this is the first bonus question I will give you an hint: the Plus 3 brick does not exist, but you can achieve the same with two bricks Plus.
Exercise: The Type String
Now let's continue with a very common type: String
This strange type name is actually very common in programming languages and it represents a text basically. In most languages it is enclosed with double quotes, so the text Hello World! would be written "Hello World!". This is useful to recognize a string, for example an empty text or a single space is easier seen like this " " than this (trust me there is a space 😃).
I will use the double quote notation in this book for readability, but keep in mind that you don't need them in DRAW.
However in DRAW we don't use the double quotes since the type of an IO is always visible, we don't need it. With a little sacrifice on the visibility, but it is quite rare to write a single space anyway.
What can we do with the String type? Unlike the Number type we cannot do algebraic operations on texts, it would not do any sense. But we can do a lot of other stuff with them and manipulate them to our needs.
One of the most basic operation doable on strings is concatenation. It is like addition for numbers but for strings. It is pretty simple: let's say we have two strings "Hello" and "World" and we concatenate them, the result would be "HelloWorld". Notice the missing middle space, to solve this we could use "Hello " instead 😉
In DRAW there is a brick for concatenation: Concat
Actually there are also version of the brick for more than two inputs: Concat 3, Concat 4, etc.
Let's use it in an exercise!
Exercise: String concatenation
Statement: create a brick called Say Hello that takes one input name of type String, and returns one output greeting of type String. If my input is "Patrick", the output should be "Hello Patrick".
Hints:
- Start by writing the the descriptions in the Spec&Doc, it is always a good start
- The brick for concatenation is called Concat
- Do not forget to add a space in the middle
- Use the Run button to test out the logic
Solution:
Say Hello brick
Bonus question: create a brick Say Hello with Enthusiasm, with the input "Patrick" it should return "Hello Patrick!!".
Exercise: The Type Boolean
Now let's continue with another very common type: Boolean
This type is vers useful to represent a binary state, basically a state with only two values possible. It applies to many situations: active/inactive, shown/hidden, enabled/disabled, true/false, etc. In DRAW, as in many programming language, the values are either true or false. And it works for all situations: for example we have an input is shown of type Boolean which can be either true (shown) or false (hidden). And what is cool is that is work in reverse too: with an input is hidden the value true is hidden and the value false is shown.
As for Number and String, there are many operations we can do on Boolean, namely And, Or and many others. But we won't use them for now. What is really interesting with Boolean is that we can get them from conditions, and change our logic depending on the result! A condition could be: is the age above 30 years old (age>30)? And if the result is true, then we greet the person differently!
Let's create a new function called Say Hello Politely, and add in it the brick Is Greater Than.
If you click its documentation you will see: Returns true if a is bigger than b. If strictly is set to false, then it returns true if a is bigger or equal to b.
This is exactly what we need. But how can we test the brick to get a feel on how it works? Until now we only tested our own brick, but we can also test other brick! By double-clicking on a brick's name you will enter it. Then you can use the Run button as usual 😉 This can be very useful, so do not hesitate to play with it:

Now we know how to create a Boolean from a condition. Let's see how to change our logic depending on the result! For this the main brick is called If, go ahead and add it in our brick Say Hello Politely.
This brick documentation is not very simple for a beginner, let me rephrase it:
We have three inputs:
condition,aandb. If theconditionvalue is true, then the output value is equal to the value ofa. Otherwise if theconditionvalue if false, then the output value is equal to thebvalue.
The type of
aandbis Object, this type basically represent any or all type. Let's not talk about it for now, just remember that you can use Number, String and even Boolean with this If brick.
Testing it may be worth a thousand words, so let's do it:

What about we add the logic of the Say Hello Politey brick now? 💪
Exercise: A better Say Hello
Statement: add the logic of the brick Say Hello Politely, it takes two inputs: age of type Number and name of type String. For a name "Patrick" and a age below 30 years old, it greets like the Say Hello brick. However if the age is greater of equal to 30, then it returns Dear Elder Patrick.
Hints:
- Start by writing the the descriptions in the Spec&Doc, it is always a good start
- For the old people you will use the Concat brick again
- But for the young people, you can re-use the Say Hello brick!
- This exercise is a tad more complex, so take your time
- Use the Run button to test out the logic
Solution:
Say Hello Politely brick

Bonus question: try to add a third greeting style for a person with an age above 100 years old. This can be quite tricky so don't worry if you don't get it directly, as an hint I can tell you that you will need to connect two If together 😉
Practice Project
Pffiu.. what a long chapter! From functions to types and from inputs to outputs, we covered a lot of Logic ground today, Congrats! 🎉
Feel free to make a break now, maybe re-read a difficult section tomorrow or come back to it later. And continue to the next chapter where we will see more UI this time 😃
If you still have some energy left, we will here start a fun little project to put everything in practice. This project section will be at the end of each chapters and by the end of the part it will be completed!
You can do this section chapter per chapter, or do them all at once when you have finished reading all chapters. That's up to you 😉
What is the Project?
Now what project will we do? It is actually a small game called: Guess the Number!
It is a pretty simple one but it will put in practice most concepts learnt in the chapters.
This is how the game plays, you may have already heard of it:
- The game starts with a mystery number that the player does not know.
- This number is randomly generated, and its value is between 1 and 100.
- The player tries to guess this value, he or she enters a number.
- At this point there is three cases:
- The number entered is too small, the player goes back to step 2.
- The number entered is too big, the player goes back to step 2.
- The number entered is correct! The player wins!
- Additionnaly, the player has only 10 maximum guesses before game over.
You can find the game we will create here!
Let's setup the project in DRAW:
- Create a new project called Guess the Number!
- In it, create a new Folder called Logic
- In the Logic folder, create a new Function called Check Guess
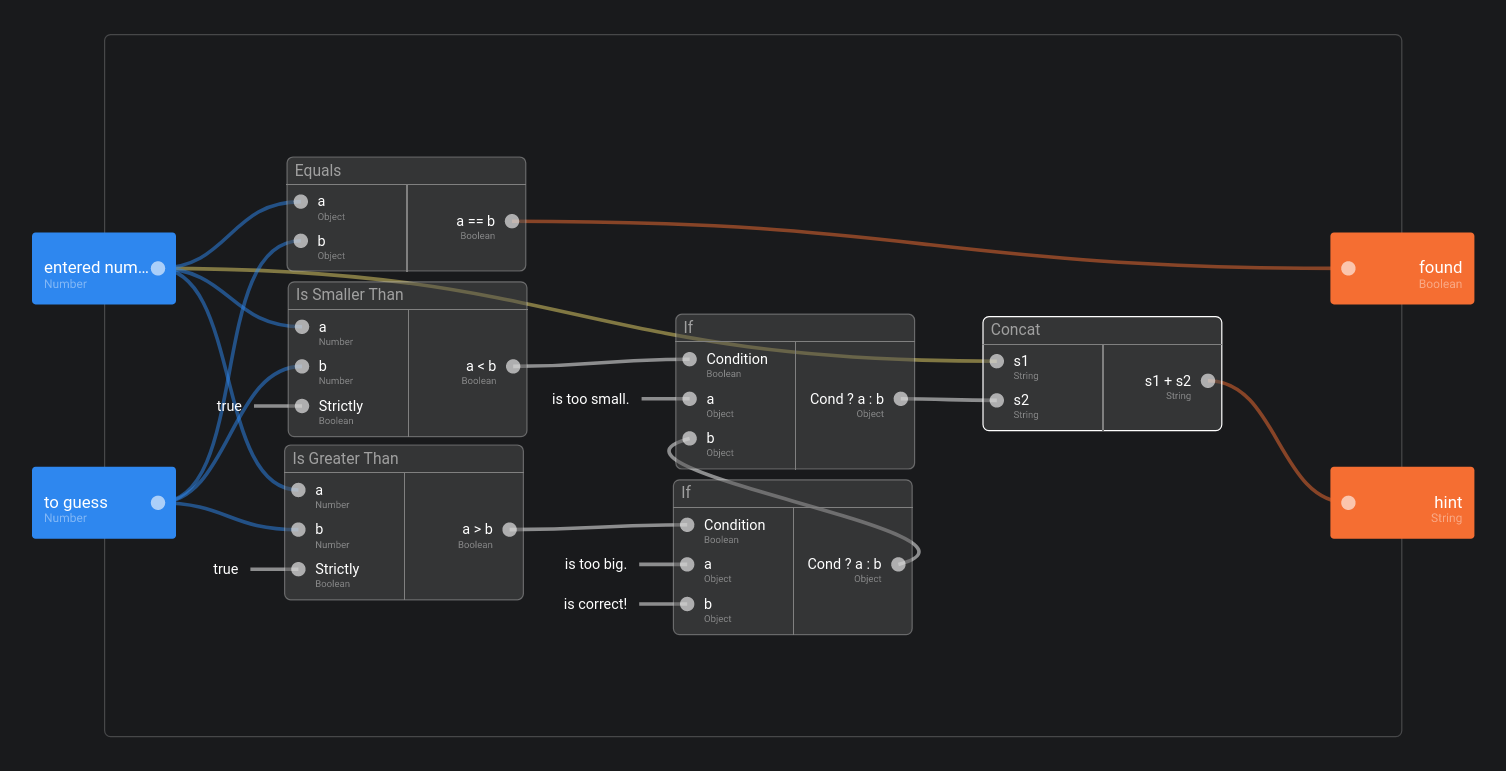
Exercise: Check Guess
The goal of the brick Check Guess is to compare the entered number with the number to guess. The function returns two outputs: found which is true if both numbers are equal, and hint which is a String saying one of this three possibilities: "X is too small.", "X is too big." or "X is correct!" (X being the entered number).
This is the documentation of the function:

Now try doing the logic of it 😉
It is not that simple so be patient if you don't get it right directly.
Hints:
Check Guess brick
- Focus on one output at a time, start with the
foundone. - The brick for checking the equality of two numbers is Equals.
- The contrary brick of Is Greater Than is Is Smaller Than.
- The input of a Concat brick could be the output of a If brick.
- You will need two If bricks.
Solution:
Check Guess brick